Understand your equipment
Know your camera.
Make deliberate choices.
Plain-English lessons on exposure, focus, lenses, and the settings behind your photographs.
Start with exposure Browse the topics ↓A practical learning path
Start with the camera you have.
Learn one control, try it in a real scene, and keep a photograph to compare.
Understand exposure
Connect the controls to brightness, depth of field, and movement.
Place your focus
Choose the subject and check which part of the image is sharp.
Explore your framing
Compare focal lengths and camera positions.
Choose your files
Understand RAW, JPEG, and white balance.
Explore the basics
Read the explanations, compare the examples, then try the exercises.
Before your first lesson
What happens when you take a photograph?
Light passes through the lens and reaches the camera’s sensor. The lens forms the image; the sensor records it. Aperture controls the opening in the lens, shutter speed controls the recording time, and ISO helps determine how bright the recorded image appears. Focus sets the distance that looks sharp.
You can let the camera make these choices in Auto, or choose some of them yourself. Start in daylight with a still subject. You do not need a new camera or a new lens to understand the controls.
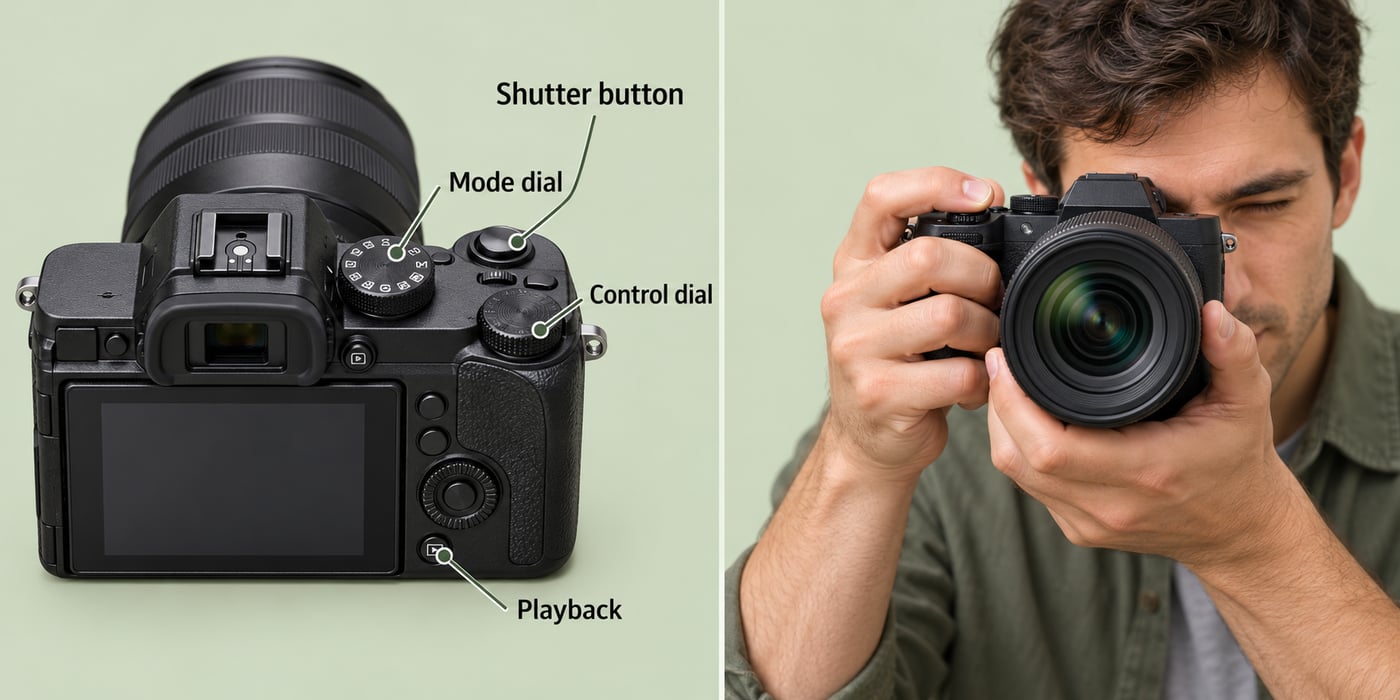
Find these controls
- Mode dial or mode menu: Auto, P, A/Av, S/Tv, and M.
- Shutter button: a half-press usually starts metering and autofocus; a full press takes the picture.
- Control dial: changes a setting such as aperture or shutter speed.
- Focus area and AF mode: choose where and how the camera focuses.
- Playback and magnify: review the image and inspect sharpness.
Get ready
- Charge the battery, insert a memory card, and remove the lens cap.
- Set the lens or camera to autofocus. Leave stabilisation on for handheld practice unless your manual says otherwise.
- Start with JPEG, or RAW + JPEG if you plan to edit. Use Auto white balance.
- Hold the grip with your right hand and support the lens with your left. Keep elbows close and press the shutter gently.
Menu names differ between brands. Use your camera manual to find the equivalent controls. Some phones and compact cameras offer fewer settings; practise with the controls available.
Lesson 01 · Light and brightness
Aperture, shutter speed, and ISO
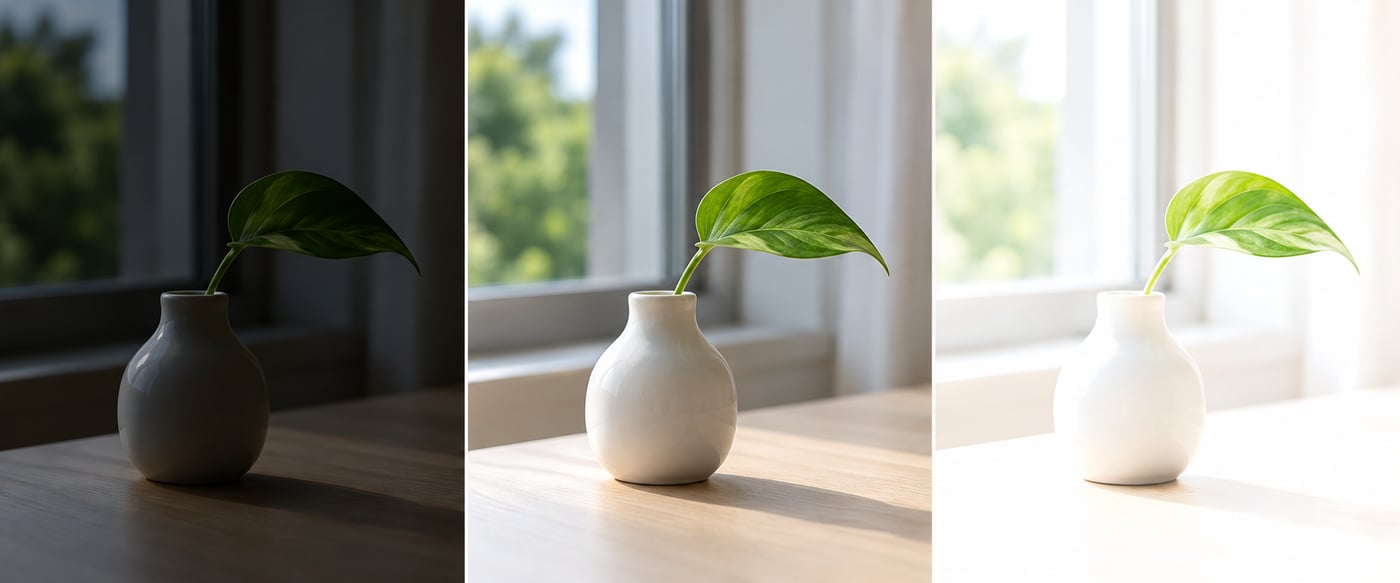
Exposure is the light recorded by the sensor. Too little can leave important areas dark; too much can turn bright areas into featureless white. Brightness is also affected by ISO and processing. A correctly exposed photograph depends on the subject and the look you want.
Aperture: the opening in your lens
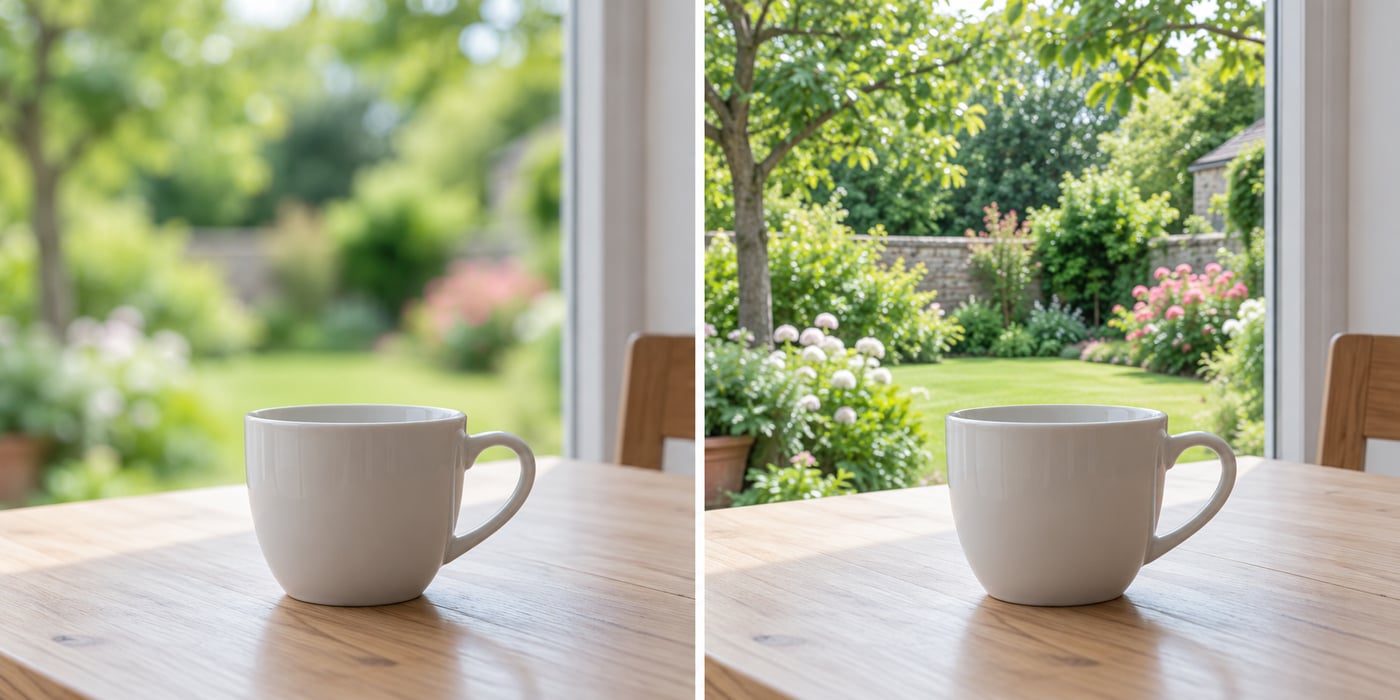
Aperture is written as an f-number: f/2.8, f/4, f/5.6, f/8. A smaller number means a wider opening. At the same shutter speed, f/2.8 lets in more light than f/8.
Aperture also affects depth of field: the range of distances that looks acceptably sharp. A wide aperture can help separate a person from a soft background. A narrower aperture can help keep more of a scene sharp. Focus distance, focal length, sensor size, and viewing size also affect the result. f/8 does not automatically make everything sharp.
Shutter speed: how long light is recorded
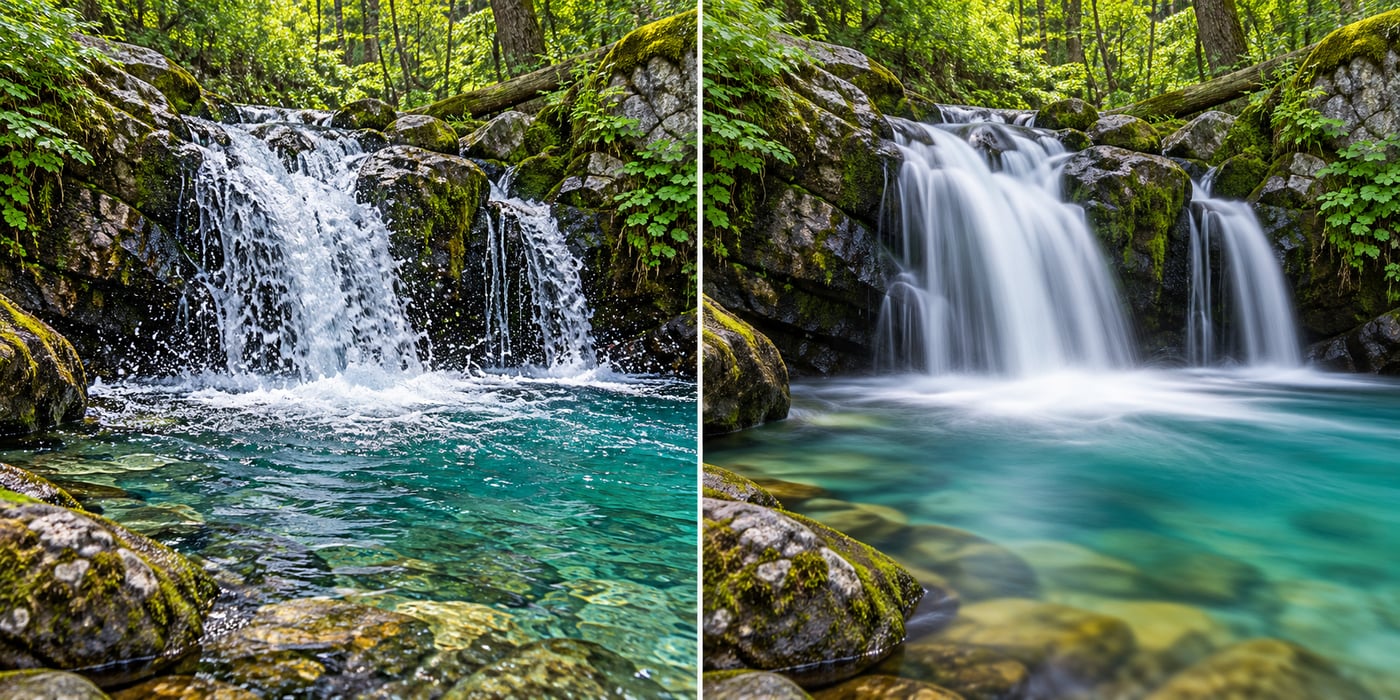
1/1000 means one thousandth of a second; 1/30 is a longer recording time. A fast shutter can freeze movement. A slow shutter can show movement as blur and makes camera shake easier to see.
For example, 1/500 second may be a starting point for a walking person, while 1/4 second can blur flowing water with the camera supported. Faster action may need 1/1000 or faster. These are starting points: movement, distance, lens, and the result you want decide the final setting.
ISO: brightness when light is limited
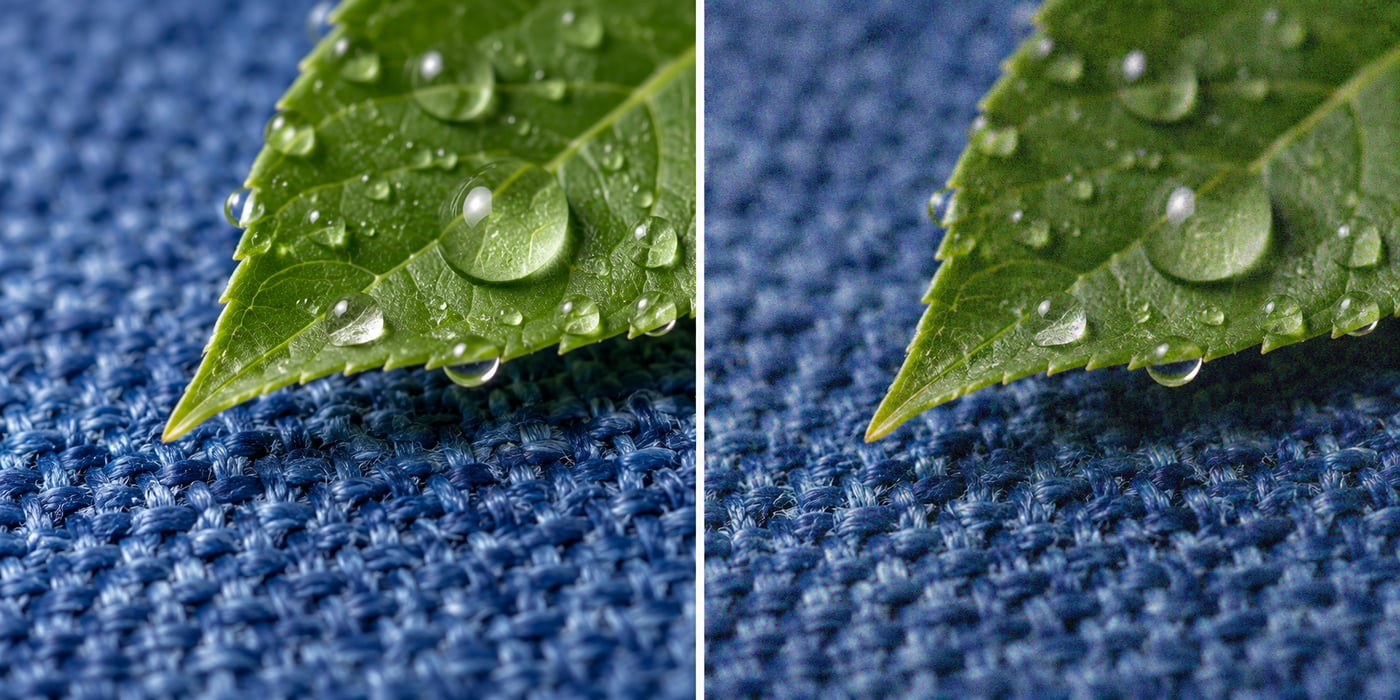
ISO is shown as numbers such as 100, 400, and 1600. At the same aperture and shutter speed, a higher ISO usually produces a brighter image. It does not add light to the scene or sensor. Higher ISO can help you keep a useful shutter speed in dim conditions, but noise and reduced highlight range can become more noticeable.
Start with a low ISO when there is enough light. Raise it, or use Auto ISO, when a low ISO would force an unsuitable shutter speed. A slightly noisy sharp photograph is often more useful than a clean blurred one.
| Change | Brightness | Main visual trade-off |
|---|---|---|
| f/8 → f/4 | More light | Usually less depth of field |
| 1/250 → 1/1000 | Less light | Less movement blur |
| ISO 100 → ISO 400 | Brighter recorded image | Noise / highlight range may suffer |
How the controls work together
Imagine f/4, 1/250 second, ISO 400 gives the brightness you want. Changing to 1/500 halves the recording time. Raising ISO to 800 can restore similar brightness, with a possible image-quality trade-off. Opening from f/4 to f/2.8 can also compensate, but changes depth of field. These examples assume steady light and conventional full-stop settings.
A stop means doubling or halving a quantity. 1/250 to 1/500 is one stop less light; ISO 400 to 800 is one stop higher ISO. You do not need to memorise the whole scale to begin: change one setting and look at the result.
- Put a cup near a window, with the background farther away.
- Select A/Av, autofocus on the cup, and use Auto ISO. Keep your position fixed.
- Take one frame at the widest available aperture, then one at f/8.
- Compare background detail and check the shutter speeds the camera chose. If a speed is too slow for handheld shooting, add support or more light.
When the photograph is too bright or dark
In P, A/Av, or S/Tv, find exposure compensation, usually marked +/−. Try +0.7 EV to brighten the metered result or −0.7 EV to darken it, then review. A meter can be misled by a very bright or dark subject. Exposure compensation behaviour in M with Auto ISO varies by camera.
A histogram shows the distribution of tones, from dark on the left to bright on the right. There is no ideal shape for every scene. Use it with highlight warnings to check whether important bright areas are losing detail; a bright sky can be clipped even when the overall picture looks reasonable.
Lesson 02 · A clear subject
Focus and sharpness are different choices
Focus sets the distance at which detail is sharpest. A focus point or area tells the camera where to look. It does not guarantee that everything in the frame is sharp, and autofocus cannot prevent movement blur from a slow shutter.
For a still subject
Use single autofocus, often called AF-S or One-Shot. Choose a small focus area over the part that matters, such as the nearer eye in a portrait or a clear edge on an object. Half-press to focus, then take the picture. Avoid large changes in framing after focusing at close distances with a wide aperture.
For a moving subject
Use continuous autofocus, often called AF-C or AI Servo, and a suitable tracking area. Keep the focus area on the subject while shooting. Eye detection can help with people if your camera supports it. Pair autofocus with a fast enough shutter speed.
Work out why a photograph is soft
- The background is sharp but the subject is soft: check where the camera focused.
- A moving hand or person is blurred but the scene is sharp: use a faster shutter for the subject.
- The whole frame shows similar streaks: suspect camera shake; improve support or shutter speed.
- Only a thin slice is sharp: depth of field may be too shallow; try a narrower aperture or adjust distance.
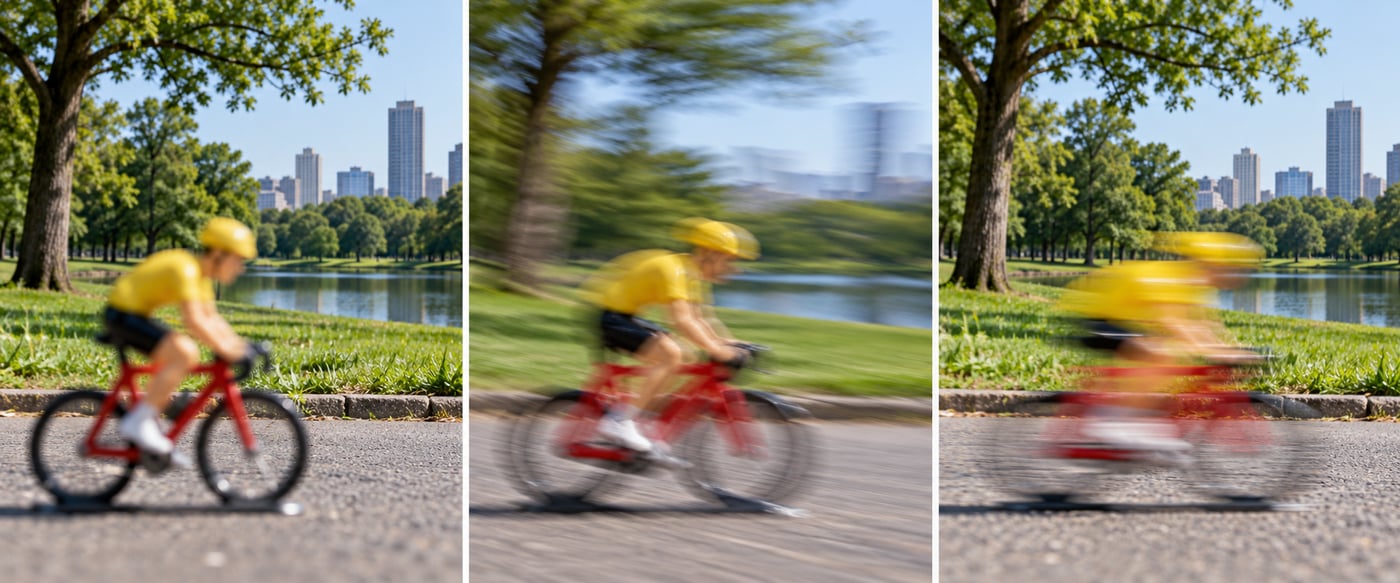
Stabilisation helps with camera movement. It does not freeze a moving person. Very slow shutter speeds can still need a tripod, and tripod settings depend on your camera and lens.
Place two objects at different distances. Select a single focus point and photograph the nearer object, then the farther object. Magnify each image in playback. Notice how the sharpest area moves even though you have not changed the composition.
Lesson 03 · What your lens sees
Focal length, zoom, and camera position
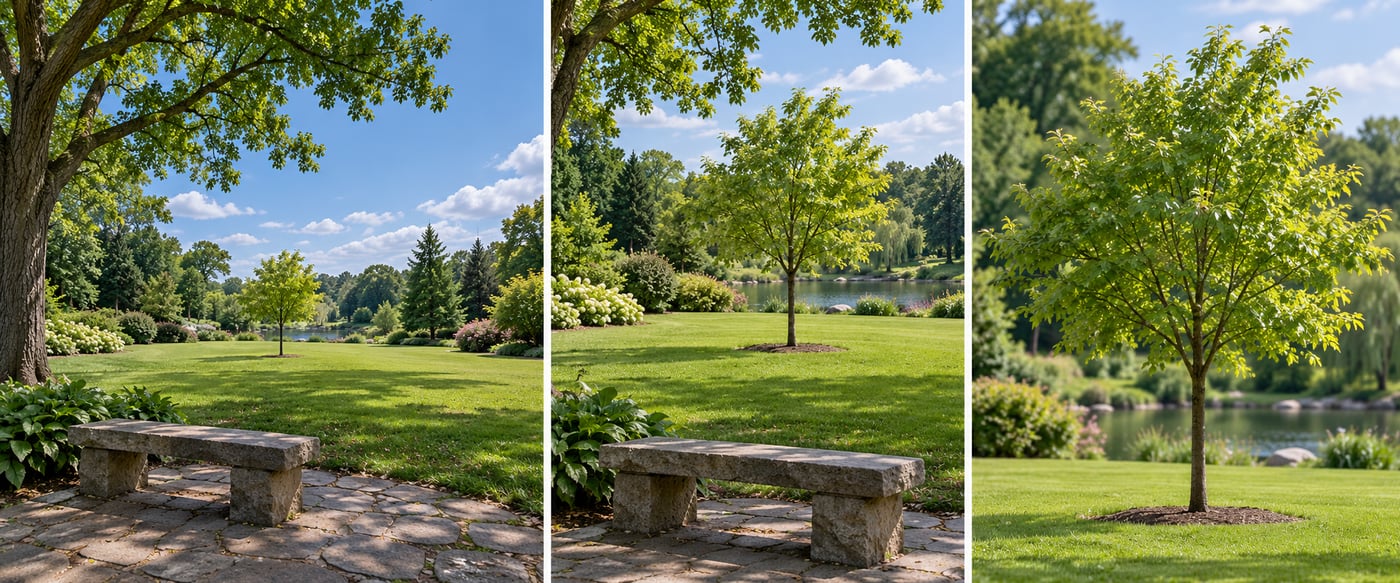
Focal length is measured in millimetres, such as 24mm, 50mm, or 200mm. On the same camera, a shorter focal length includes a wider view. A longer focal length frames a smaller part of the scene and makes a distant subject appear larger in the frame.
A prime lens has one focal length. A zoom lens offers a range, such as 18–55mm. Turning a zoom ring changes framing from the same position. Turning a focus ring changes focus distance; they do different jobs.
| Range | What it includes | Practice subject |
|---|---|---|
| Wide: about 16–35mm | More surroundings | A room or landscape |
| Normal: about 40–60mm | A moderate view | An everyday scene |
| Telephoto: about 70mm and longer | A narrower part of the scene | A distant detail |
These are loose descriptions, not rules about what a lens is allowed to photograph. Sensor size matters: a 35mm lens on a camera with a 1.5× crop factor gives roughly the field of view of a 52.5mm lens on full frame. The actual focal length remains 35mm.
More of the scene
Less of the scene
Perspective comes from where you stand
From the same position, zooming changes framing. Moving closer changes the relationship between near and far objects. If you use a wide lens very close to a face, the nose can appear larger relative to the ears because of that close viewpoint. Step back and choose a longer focal length if you want a similar-sized subject from a different perspective.
Read the numbers on the lens
“18–55mm f/3.5–5.6” describes a zoom with a widest available aperture that changes across the zoom range. “50mm f/1.8” describes a prime with a maximum aperture of f/1.8. Those numbers alone do not tell you whether a lens fits your camera; mount compatibility is a separate issue.
- From one safe position, make a wide frame and a tighter frame with your zoom.
- Then choose a wider focal length and move closer to keep the subject a similar size.
- Compare background size and the spacing of near and far objects. Record your position as well as the focal length.
Lesson 04 · Decide what to control
Auto, P, A/Av, S/Tv, and M
A shooting mode decides which exposure settings you choose and which the camera chooses. Automatic help is useful while you learn. Manual mode is useful when you want consistent control; it does not inherently produce a better photograph.
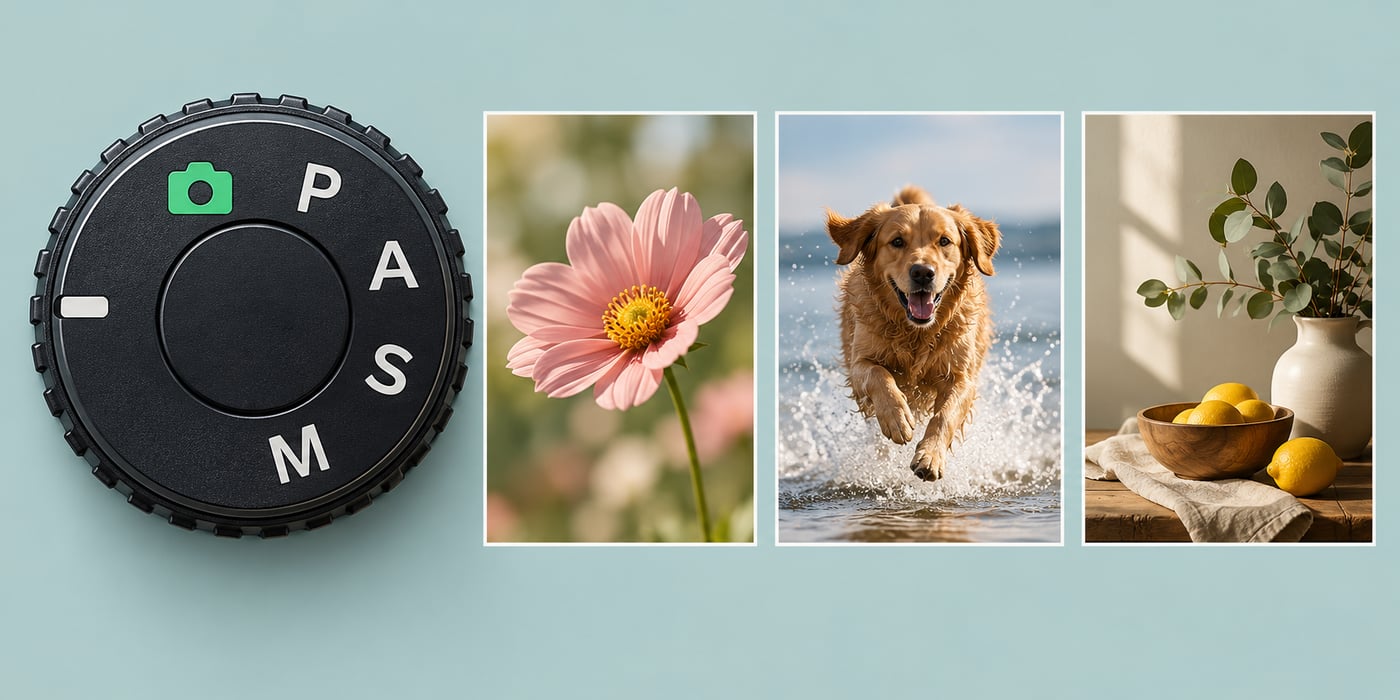
| Mode | You control | Camera controls | Good place to start |
|---|---|---|---|
| Auto | Framing and subject | Most settings, sometimes flash | Learning handling and timing |
| P: Program | Often ISO, compensation, focus | Aperture and shutter | General practice |
| A / Av | Aperture | Shutter speed | Depth of field |
| S / Tv | Shutter speed | Aperture | Movement |
| M: Manual | Aperture and shutter speed | ISO if Auto ISO is on | Steady light and deliberate comparisons |
ISO can be set manually or automatically in many modes. Other controls depend on the model. In A/Av, the camera may choose a shutter too slow for your subject. In S/Tv, the lens may not open wide enough in low light. Watch the display for exposure warnings rather than assuming the mode solved everything.
For a still object in daylight, try A/Av, f/5.6 if available, Auto ISO, single autofocus, and Auto white balance. Review the shutter speed before shooting. If it is too slow to hold steadily, find more light, support the camera, or use a wider aperture. Treat this as a practice setup, not a preset for every scene.
Lesson 05 · Save and review
JPEG, RAW, and white balance
JPEG is a processed, compressed image that is easy to view and share. The camera applies colour, contrast, sharpening, and other choices before saving it. It is a straightforward starting point when you want to concentrate on taking photographs.
RAW keeps sensor data with metadata for processing in compatible software. It gives more flexibility for adjusting white balance and some tones, but files are usually larger and need processing. It cannot recover every blown highlight or fix missed focus. RAW + JPEG saves both versions and uses more storage.
White balance: why white can look blue or orange
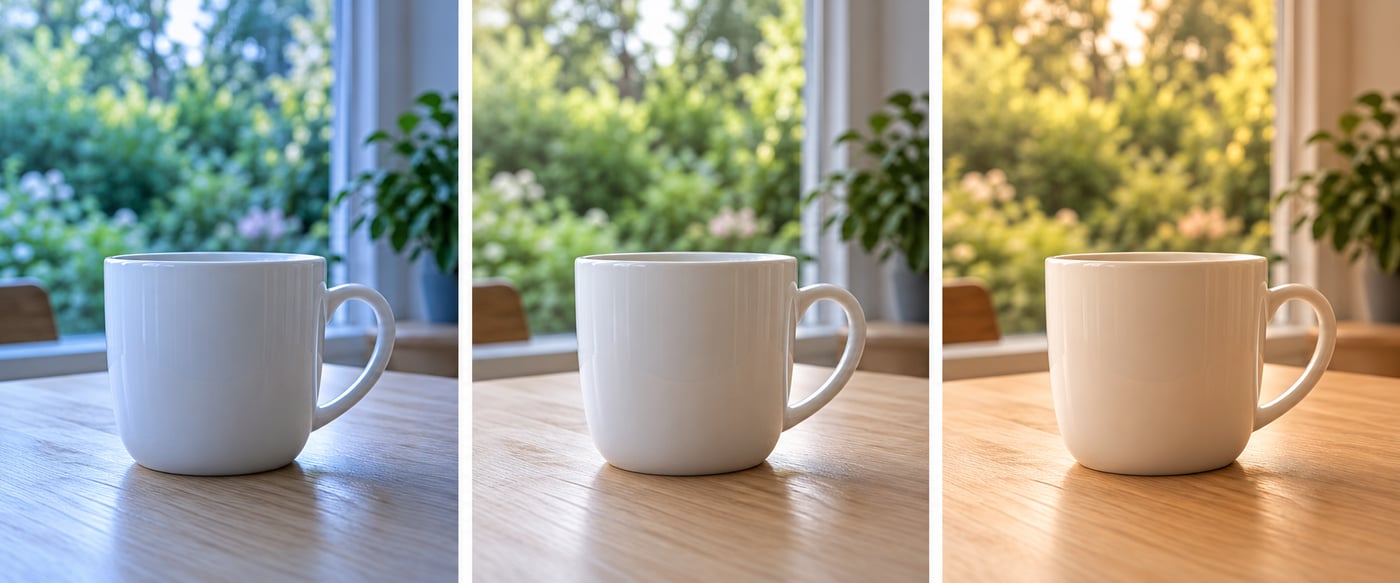
Daylight, shade, and household lamps have different colour characteristics. White balance changes how those colours are rendered. Auto white balance is a sensible starting point. Daylight, Cloudy, and Tungsten presets can help you make a deliberate choice or keep colour consistent.
A higher Kelvin white balance setting generally renders the same scene warmer; a lower setting renders it cooler. White balance is more flexible to change from RAW than from an already processed JPEG. Mixed lighting can still produce different colours in different parts of the scene.
Review before you move on
- Check the overall brightness and important highlights.
- Magnify the subject to inspect focus and movement blur.
- Check the frame edges and background for distractions.
- Keep the original file. Make edits on a copy or use software that preserves the original.
Under one steady light source, photograph a white or neutral object using Auto, Daylight, and Tungsten white balance. Compare the colour shifts. Pick the version that suits the scene, rather than assuming the warmest or coolest frame is best.
Your first session
A 20-minute practice plan
- Minutes 0–5: photograph a still object in Auto. Find the aperture, shutter speed, and ISO in playback information.
- Minutes 5–10: switch to A/Av. Compare the widest available aperture with f/8 from one position. Check background blur and shutter speed.
- Minutes 10–15: focus on two objects at different distances, one at a time. Check both images at high magnification.
- Minutes 15–20: compare two focal lengths, then change your position. Choose three frames and write down what changed.
When a result looks wrong, ask one question first: is the problem brightness, focus, movement, framing, or colour? Change the control connected to that problem and make another frame.
Continue with composition, portraits, and landscape practice →
Control names and available settings vary by camera. Use your camera manual alongside these exercises. Photographs and comparison images are AI-generated teaching illustrations, not measured camera tests.
Tutorial library
Long-form lessons from the Camera & Lens Basics categories.
-
Camera Metering Modes Explained: When to Use Each One
Published: November 14, 2026 · Updated: November 14, 2026 · By Ethan Fletcher, CaptureView contributor Your camera’s meter tries to choose an exposure that makes the scene’s tones…
-
What Does Aperture Do? A Beginner’s Guide to Exposure and Background Blur
By Owen Ellis, CaptureView editorial pen name The aperture setting controls how much light passes through the lens and affects depth of field. Aperture is the opening inside…
-
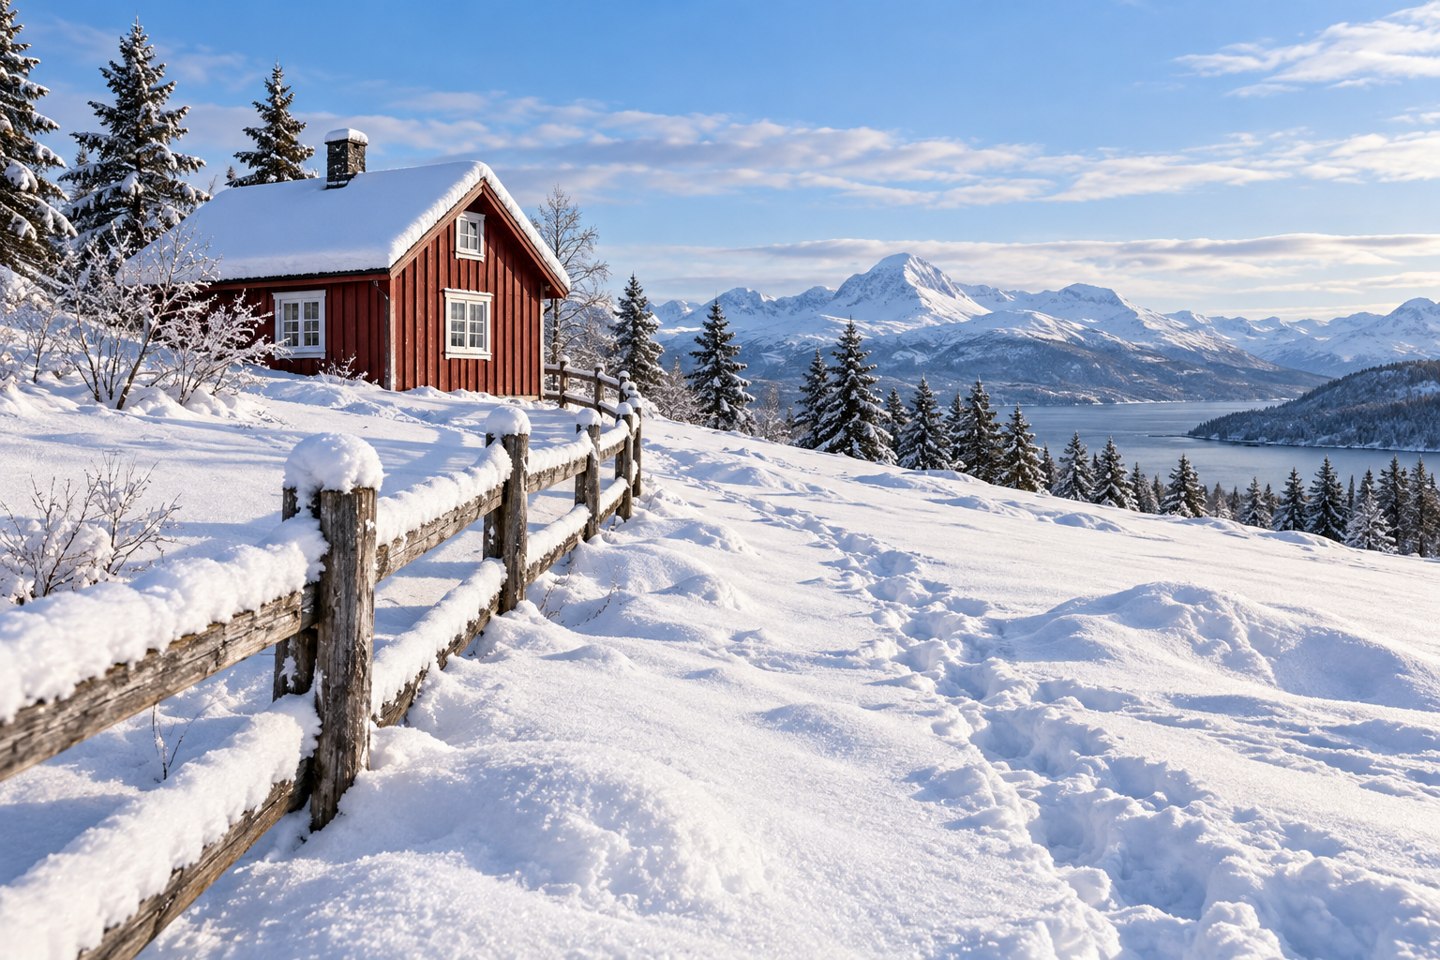
Why snow looks grey in photos and how to expose it
Use exposure compensation to brighten dull snow, check the important highlights, and distinguish a brightness problem from a blue colour cast.
-
RAW or JPEG for Beginners: Choose a File You Can Actually Use
Choose RAW, JPEG, or both based on software, storage, editing, and sharing. Try a short comparison and keep your capture originals.
-
Why a Wider Lens Does Not Automatically Fit More Into a Better Photo
Use a wide lens with purpose. Check foreground scale, frame edges, camera tilt, and how viewpoint differs from changing focal length.
-
How to Choose an Autofocus Area for a Still Subject
Choose an autofocus area for still subjects. Place it on useful detail, avoid background selection, and check focus before reframing.
-
Aperture Priority: What to Check Before You Press the Shutter
Use aperture priority deliberately: choose depth of field, check shutter speed and Auto ISO, and watch warnings as the light changes.
-
How to Use Exposure Compensation When Your Camera Gets Brightness Wrong
Use exposure compensation when metering gives the wrong brightness. Check highlights and camera settings, and know when to reset the control.