Author: admin

  • Camera Metering Modes Explained: When to Use Each One

    Published: November 14, 2026 · Updated: November 14, 2026 · By Ethan Fletcher, CaptureView contributor

    Your camera’s meter tries to choose an exposure that makes the scene’s tones average out in a familiar range. That works well for many everyday pictures, but a bright window, a dark stage, or a small subject against a large background can pull the reading away from what you intended. Metering mode changes how the camera evaluates the scene. It does not change the sensor’s dynamic range, and it cannot decide which part of the photograph matters to you.

    This guide explains evaluative or matrix metering, centre-weighted metering, and spot metering in practical terms. Names and exact behavior vary by camera, so treat them as descriptions of a general approach. A short test with your own camera is more useful than assuming two manufacturers calculate the same scene in the same way.

    What the meter is trying to do

    A reflected-light meter reads the light coming back from the scene. Since it does not know whether it is looking at white snow, a black coat, or a grey wall, it makes a best guess based on the tones in its sample area. A frame filled with a white subject may be rendered darker than you expect; a dark subject can be lifted. That is why snow can look dull grey and a night scene can look too bright.

    The camera’s exposure system uses this reading together with your selected exposure mode. In aperture priority, the meter influences shutter speed. In shutter priority, it influences aperture or ISO if Auto ISO is active. In manual mode with auto ISO, the meter can influence ISO. Manual exposure with fixed ISO does not automatically change the exposure when the meter reading moves, though the meter scale still shows whether your settings differ from the camera’s suggestion.

    Evaluative or matrix metering

    Evaluative, matrix, or multi-pattern metering considers several areas across the frame. Some cameras also use focus distance, detected faces, color, or scene information in their calculation. It is the most practical starting point for general photography because it responds to the whole composition instead of depending on one small patch.

    Use it when the scene has a reasonably balanced mix of tones, when you are moving quickly, or when the subject and background both matter. It usually gives a useful exposure for travel, everyday scenes, and many landscapes. It can still be fooled by a bright sky occupying much of the frame, a white wall behind a person, or a dark subject surrounded by snow. If the result is consistently too bright or too dark, check the exposure compensation setting before changing modes. A forgotten compensation value can make the camera seem unpredictable.

    Centre-weighted metering

    Centre-weighted metering reads most of the frame but gives more importance to the middle area. It is an older, predictable approach that can be useful when the subject stays near the centre and you do not want the outer edges to dominate the reading. A person against a bright sky is one example, although a face near a window may still require you to watch highlights and shadows.

    Because it favours the centre, it is less helpful when the important subject is far off to one side. It also does not know whether the central object is white or black. If you fill the centre with a dark coat and let the camera choose exposure, the coat may become brighter and the background may lose highlight detail. Use the histogram and preview to decide whether the result suits the scene.

    Spot metering

    Spot metering reads a small area, often near the active focus point or the centre of the viewfinder. Its size and link to autofocus vary by camera. It gives you more control over which tone informs the reading, but it also asks you to choose carefully. Pointing the spot at a very bright white shirt can lead the camera to darken the exposure; pointing it at a deep shadow can lead it to brighten the scene.

    Spot metering is useful when a small subject matters more than the background, such as a performer under a spotlight or a backlit face. It is also useful for comparing tones in a high-contrast scene. If you meter from a face, remember the reading is still based on reflected light. Skin tone, makeup, shadows, and the camera’s calibration all affect the result. Start with the face, take a frame, and check whether the highlights on the skin and the surrounding scene retain the detail you need.

    Metering is not the same as focus

    Autofocus determines where the lens should be sharp. Metering estimates exposure. Some cameras link a spot-meter area to the selected focus point, but that does not make the two systems identical. A focus point can sit on a dark eye while the exposure system evaluates most of the frame. Conversely, a spot meter can read a bright background while autofocus remains locked on the subject.

    If your camera offers exposure lock, you can aim the meter at the area you want to read, lock that exposure, recompose, and then focus on the subject. Check your manual to learn how long the lock remains active and whether pressing the shutter halfway changes it. This technique can be useful when the subject moves off centre, but you should confirm that the locked reading still makes sense after you recompose.

    Practical examples

    Backlit portrait: Evaluative metering may balance the person and the bright background, but the face can remain dark. Try a spot reading from the face or use exposure compensation to brighten the subject, then check whether the sky clips. If keeping the window or sunset detail is essential, use fill flash or change the subject’s position rather than expecting a meter mode to create light that is not there.

    Snow or a pale wall: The camera may reduce exposure because a large bright area looks unusually light to the meter. Check the image and histogram; positive exposure compensation may restore a brighter appearance. Avoid copying a fixed compensation value from someone else, since the amount depends on the light, composition, and camera.

    Dark stage with a spotlight: A wide-area mode may react to the dark auditorium and brighten it, potentially washing out the performer. Spot metering on the lit subject can be a better starting point. Take a test frame as the lighting changes and protect important highlights. If the performer is moving, shutter speed may be more important than matching the camera’s suggested brightness exactly.

    Landscape with bright sky: Matrix metering usually balances the frame, but a large bright sky may still leave the foreground too dark. A graduated neutral-density filter can reduce the difference between sky and ground, while shooting RAW can give more room to adjust recoverable tones later. Neither option can restore detail that was clipped or lost to noise.

    A quick way to test the modes

    Choose a stationary subject beside a bright window. Keep the camera position fixed and use the same aperture, shutter speed, and ISO for each frame in manual exposure. Switch among evaluative, centre-weighted, and spot modes while watching the meter scale. In fully manual exposure, the recorded brightness should not change when only metering mode changes; what changes is the meter’s recommendation. Then repeat in aperture priority and note how the shutter speed responds.

    For the second test, place a mid-tone object in the centre and then move it to the edge. Compare the readings in centre-weighted and spot modes. If your camera ties the spot area to the active focus point, move that point deliberately and see whether the reading follows. Record what your specific model does. This small test helps you understand the controls before a moment that cannot be repeated.

    Choose the simplest mode that works

    Changing metering mode is not a requirement for every difficult exposure. Many photographers leave evaluative metering on and use exposure compensation when a scene needs to be brighter or darker than the camera’s default. Spot metering is helpful when you can identify a meaningful area to read and have time to check the result. Centre-weighted metering offers a middle ground when the subject stays near the centre.

    Whichever mode you choose, review the photograph rather than treating the meter as a verdict. Look at the subject, important highlights, shadows, and histogram. If the exposure is wrong, ask what area influenced the reading and whether the subject moved. Then change one control and take another frame. Understanding the meter gives you a reason for each adjustment—and keeps you from cycling through menu settings without knowing what changed.

    Camera menus and metering names differ between models. Check your camera’s manual for the size of its spot area, how exposure lock works, and whether spot metering follows the autofocus point.

  • How to Photograph Moving Water With Long Exposures

    Published: November 13, 2026 · Updated: November 13, 2026 · By Clara Whitmore, CaptureView contributor

    Long exposures turn moving water into a soft veil while rocks, shorelines, and other stationary details stay crisp. The effect is easy to recognize, but the useful shutter speed depends on the water, the light, and how much texture you want to keep. A stream does not need the same treatment as a waterfall or a calm inlet, and a very long exposure can erase detail that would have made the photograph feel connected to the place.

    This guide walks through a repeatable way to photograph moving water. You will learn what shutter speed changes, how to steady the camera, when a neutral-density filter helps, and how to judge the result in the field.

    What shutter speed does to moving water

    The shutter records movement over time. A fast exposure can freeze individual ripples and splashes. A slower one lets water travel across the frame while the camera records its path as a blur. The water itself does not become brighter because it is white; it becomes a longer trace in the image. The surrounding rocks and trees remain sharp only if the camera is stable and they are not moving.

    There is no single “correct” long-exposure setting. At 1/4 second, small ripples may soften while larger shapes remain distinct. Around one or two seconds, a steady stream can form ribbons. Exposures of several seconds can make a waterfall or tide pool look smooth, especially when the flow is even. These are starting points, not rules. A thin trickle may need a longer exposure than a fast, turbulent cascade.

    Choose a shutter speed before adding filters

    Start in shade, near sunrise or sunset, or on a cloudy day. Set the camera on a stable tripod and compose the frame before fitting a dark filter. Use a low ISO such as 100 or 200, choose an aperture that keeps the important parts of the scene in focus, and take a test frame at a shutter speed your camera can expose without a filter. Review the water texture at the same magnification each time.

    Try a short sequence rather than guessing one number: for example, 1/4 second, 1 second, and 4 seconds. Keep the framing, focus, aperture, and ISO fixed while comparing them. The shortest frame will usually preserve the most texture; the longest will simplify the surface. Choose the frame whose water supports the subject instead of automatically choosing the smoothest one.

    Keep the camera still

    Spread the tripod legs on firm ground and press each foot into the surface. On a wooden boardwalk, bridge, or soft mud, vibration can travel through the support. Keep the centre column lowered when possible. A strap can flap in wind, so tuck it away. If your camera has a mirror, use mirror lockup or electronic front-curtain shutter where appropriate. A two-second timer or remote release prevents a finger press from nudging the camera.

    Use a stable tripod head and check that the horizon has not shifted when you tighten it. Turn off stabilization when the camera is firmly mounted if the manufacturer recommends doing so; some modern systems detect a tripod, but behavior varies. On a windy bank, shorten the tripod, widen its stance, and shield it with your body without touching the camera during exposure. Avoid hanging a heavy bag if it swings in the wind.

    When a neutral-density filter is useful

    A neutral-density filter reduces the amount of light reaching the sensor, allowing a longer shutter speed in daylight. It is useful when a scene is bright and the shutter would otherwise be too short. A three-stop filter turns 1/30 second into roughly 1/4 second; a six-stop filter can extend that exposure much further. Exact exposure depends on the filter rating and your meter, so use the camera’s metering and check the histogram.

    Before fitting a strong filter, focus and compose. Some filters make it difficult for the camera to see the scene. If autofocus hunts after the filter is attached, remove it, focus on the intended area, switch to manual focus, and then install the filter. Watch for light leaks around the filter holder, vignetting at wide focal lengths, and color shifts from inexpensive or stacked filters. A lens hood or careful shading can reduce flare, but do not let it block the frame.

    Balance depth of field and exposure

    Do not choose the smallest aperture automatically. Very high f-numbers can soften fine detail through diffraction, while a wide aperture may leave near rocks or distant banks outside the focus range. Start around f/8 or f/11 for many landscape scenes, then adjust for the actual distance and depth you need. If the foreground is close, focus carefully and review both near and far details. A wider focal length can make depth of field easier to manage, but it also changes how large the water appears in the frame.

    If you use aperture priority, watch the shutter speed the camera selects. If you use manual exposure, use the meter as a starting point and inspect highlights on bright foam. A blink warning can show where detail is at risk, but a few small clipped highlights may be acceptable in direct reflections. Preserve texture in the surrounding scene before chasing a perfectly white stream.

    Work with different kinds of water

    For a fast waterfall, begin around 1/2 to 2 seconds if you want visible flow lines. For a broad, even cascade, a longer exposure may produce a continuous sheet. For a creek with separate channels and stones, try a shorter speed so the movement remains legible. At the coast, a few seconds can record the retreat of a wave as a translucent path, while a much longer exposure may flatten the surf and hide the shape of the shoreline.

    Wind matters on lakes and pools. A long shutter smooths the water only when the surface is relatively calm; wind can create streaks, broken patterns, or reflections that disappear. Those patterns may be the strongest part of the image. If trees or grasses move during a long exposure, they will blur too. Decide whether that movement helps the scene. Shorten the exposure, wait for a lull, or frame stationary surroundings if you want a crisp landscape.

    Check more than the preview

    After each frame, inspect the histogram and zoom into a stationary edge such as a rock or railing. A bright screen can make a poor exposure look fine outdoors. Look for tripod movement, filter flare, clipped highlights, and unwanted blur in branches. If the water is a featureless white patch, reduce exposure or shorten the shutter. If it looks too frozen, lengthen the exposure slightly. Change one setting at a time so you know what improved the frame.

    Protect yourself while working near water. Keep the camera bag on dry ground, avoid placing tripod feet where a wave can move them, and do not step backward while looking at the screen. A small change in viewpoint often improves a water photograph more than another filter: move lower to give the flow a path through the frame, or step sideways to separate bright water from a distracting background.

    A simple practice exercise

    Find a small stream or fountain in steady light. Make three frames at 1/4, 1, and 4 seconds from the same tripod position. Keep focus, aperture, and ISO unchanged. Compare the shape of the water and the sharpness of the surroundings, then choose which version tells you most about the place. Repeat with a different angle and with a faster or slower section of flow. The exercise makes shutter speed a deliberate choice rather than a recipe.

    Once the water texture feels right, make a second composition that includes more context: the bank, a rock pattern, or the direction the stream travels. Long exposure is a visual tool, not the subject by itself. The strongest frame usually gives the softened water a clear route through the photograph and leaves enough fixed detail for the viewer to understand what they are seeing.

  • What Does Aperture Do? A Beginner’s Guide to Exposure and Background Blur

    By Owen Ellis, CaptureView editorial pen name


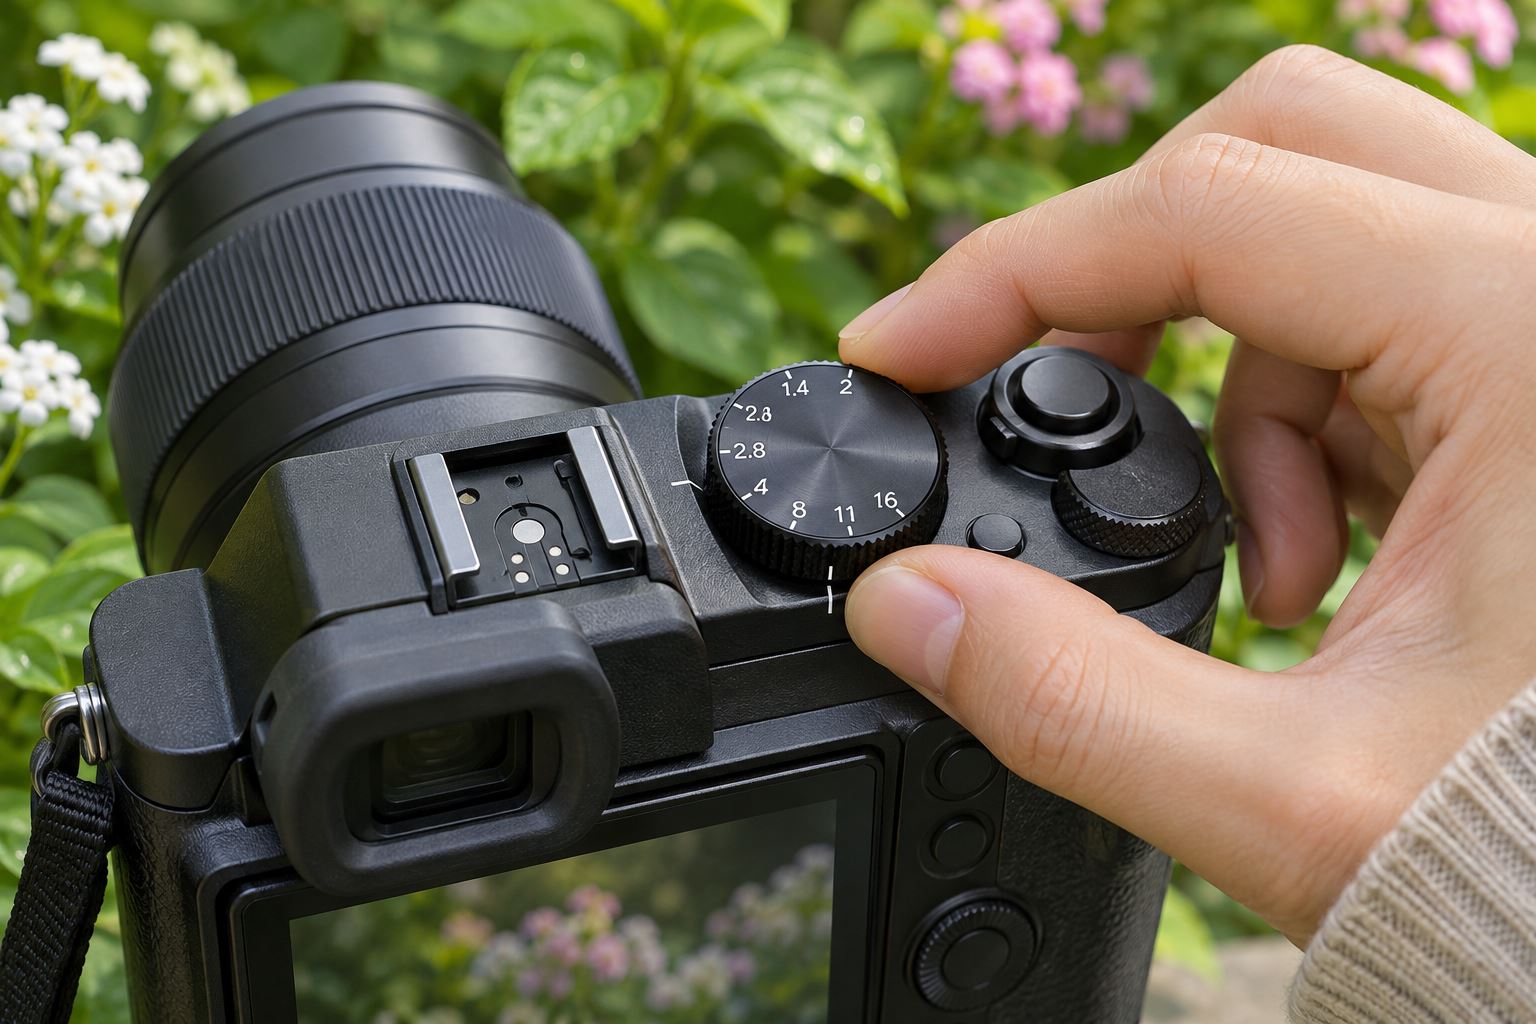
    A hand turning the aperture dial on a camera outdoors
    The aperture setting controls how much light passes through the lens and affects depth of field.

    Aperture is the opening inside a lens. It changes how much light reaches the camera sensor and how much of the scene appears in focus from front to back. Those two effects are linked, which is why aperture can feel confusing at first. A low f-number means a wide opening; a high f-number means a smaller opening.


    You do not need to memorize every setting before making a photograph. Start by deciding whether you want more background blur or more of the scene to look sharp. Then choose an aperture that fits that goal, take a test photo, and check both the subject and the exposure.


    What the f-number means


    Aperture is written as an f-number, such as f/2, f/4, f/8, or f/16. The scale runs in an unintuitive direction: f/2 is wider than f/8. At f/2, the lens opening is relatively large and lets in more light. At f/16, the opening is smaller and lets in less.


    Each full stop changes the amount of light by a factor of two. Moving from f/4 to f/5.6 halves the light. Moving from f/5.6 to f/8 halves it again. In the other direction, f/8 to f/5.6 doubles the light. Many cameras let you adjust aperture in smaller one-third-stop steps, so the numbers on the dial may not jump through the full-stop sequence.


    Why a wide aperture blurs the background


    A wide aperture can create a shallow depth of field: a narrower range in front of and behind the focus point appears acceptably sharp. That is useful for a portrait when you want attention on the eyes and less on a busy room. It does not automatically make the background disappear. The amount of blur also depends on how close you are to the subject, the distance between the subject and background, and the lens focal length.


    For a simple test, place a person or object a few feet in front of a distant background. Take one photo at the widest aperture available, then make another at f/8 without moving the camera. Compare the background, but also inspect the focused detail. If the subject is not sharp, the focus point may have landed in the wrong place or the shallow focus area may be too small.


    With a kit zoom, the widest available aperture often changes as you zoom. The camera may show a range such as f/3.5–5.6. That means the lens opens to f/3.5 at the wide end and only f/5.6 at the telephoto end. This is normal. You can still soften a background by increasing the distance between subject and background or by using the longer focal length from farther away.


    Why a smaller aperture keeps more in focus


    A smaller aperture, such as f/8 or f/11, generally increases depth of field. It can help when photographing a landscape, a group, or a tabletop scene where you want several important details to remain sharp. Focus still matters: a small aperture cannot make every distance perfectly sharp, and very small openings such as f/22 can reduce fine detail because of diffraction.


    For a landscape, f/8 is a useful starting point on many lenses. Focus on a meaningful area within the scene rather than automatically focusing at the farthest mountain. If the foreground is close and must be sharp too, make a test image and zoom in to check it. A tripod can help when the smaller aperture requires a slower shutter speed.


    Aperture changes exposure too


    Exposure is controlled by aperture, shutter speed, and ISO. If you close the aperture by one stop, the image receives half as much light unless another setting compensates. In aperture priority mode, the camera usually adjusts shutter speed for you. In manual mode, you choose the other settings yourself. Auto ISO can also raise sensitivity when the light is low.


    Watch the shutter speed when you select a small aperture indoors or at dusk. A value that is too slow can make a handheld photo blurry. If the camera drops below a comfortable speed, open the aperture, raise ISO, add light, or use support. The right choice depends on whether motion blur or noise would be more distracting in that particular picture.


    Try aperture priority as a learning tool


    Set the mode dial to A or Av, depending on the camera brand. Choose an aperture and let the camera select shutter speed. Keep ISO on Auto at first, with a reasonable upper limit if your camera allows it. This gives you room to explore depth of field without having to adjust every exposure control at once.


    Make three frames of the same still subject at the widest aperture, f/5.6, and f/8. Keep your position and focus point fixed. Review the files at the same magnification. Note how the background changes and whether the shutter speed or ISO moved. If the camera used a shutter speed too slow for handheld work, repeat the test with more light or a tripod.


    Common aperture mistakes


    • Choosing the lowest number every time: A very wide aperture can leave one eye sharp and the other soft in a close portrait. Try one stop smaller if you need more depth of field.
    • Expecting f/16 to fix missed focus: It increases the range that looks sharp, but you still need a sensible focus point and enough shutter speed.
    • Ignoring the lens limit: If the camera will not select f/1.8, the lens may not support it. Kit lenses and zoom lenses have different maximum apertures.
    • Changing several settings during a comparison: Keep framing, distance, focus, and light consistent so the aperture difference is easy to see.

    Quick practice in a garden or room


    Choose a textured object, such as a flower, mug, or small plant, and place it in front of a background with visible detail. Focus on the front edge. Photograph it at the widest aperture, then at f/5.6 and f/8. Move the object farther from the background and repeat the wide-aperture frame. You will see that subject-background distance can change blur just as clearly as the f-number.


    Before each shot, check three things: the aperture on the display, the shutter speed, and the focus indicator. Afterward, look at the actual result rather than judging only from the rear screen at arm’s length. A computer or phone display makes it easier to inspect whether the important part is sharp.


    Aperture is a creative control as well as an exposure setting. Use a wider opening when a soft background helps the subject stand out. Use a smaller opening when several parts of the scene matter. The numbers become easier to remember once you connect them to the photographs you want to make.


    Practice takeaway: Photograph one still subject at three apertures without changing your position. Compare focus depth and note how the camera compensates with shutter speed or ISO.

  • How to Use Window Light for Natural-Looking Portraits

    By Maya Ellery, CaptureView editorial pen name


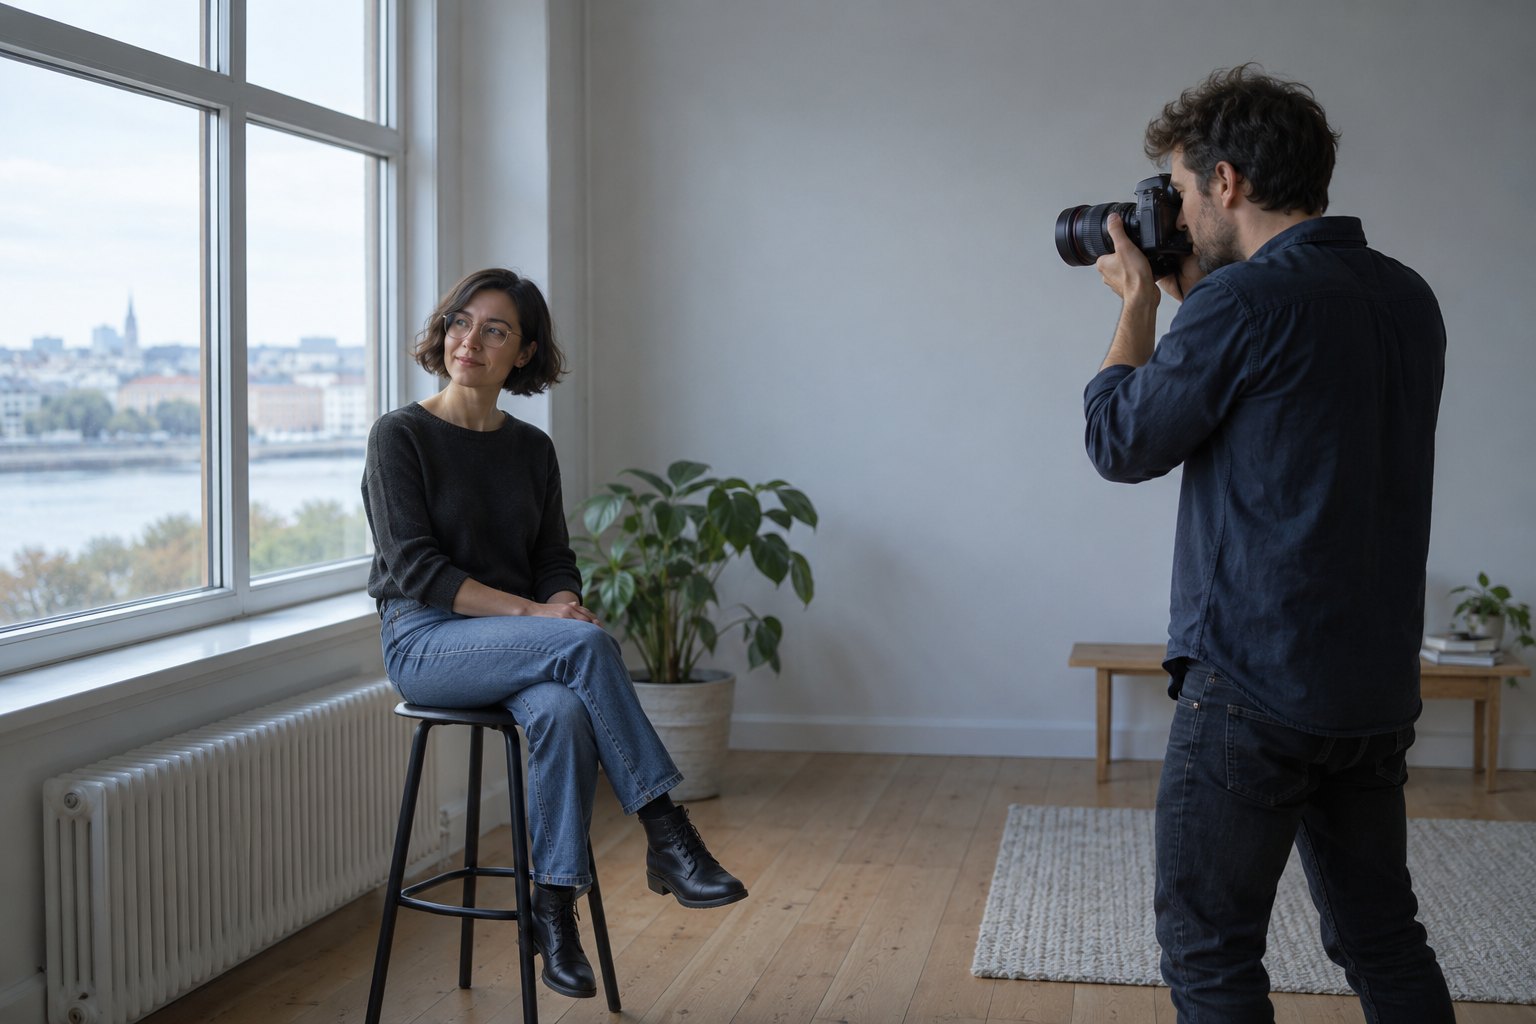
    A portrait subject near a large window with soft natural light
    Window light can create soft portrait shadows when the subject is placed thoughtfully.

    Window light is one of the easiest portrait setups to try at home. It is free, available in many rooms, and changes enough through the day to teach you how direction and distance shape a face. The trick is not to put someone beside any window and hope for flattering light. First look at the quality of the light, decide which side of the face should be brighter, and make small changes while watching the shadows.


    This guide walks through a repeatable setup for a natural-looking portrait. It uses a person, a window, and a simple reflector or pale wall. You do not need a studio flash or a fast lens. A phone camera works too, as long as you can tap to focus and keep the subject still.


    Choose a window with soft, steady light


    Start with a window that does not receive a hard beam of direct sun. On an overcast day, many windows produce broad, gentle light. If sunlight is coming straight through, try a different time of day or move the subject a little farther into the room. A thin white curtain can soften direct sun, but check that it does not add a strong color cast.


    Stand where the subject will sit and look at the window itself. If the bright sky fills most of it, the light is likely to be soft. If a sharp patch of sun falls on the floor or wall, it may create a bright stripe across the face. That can be a deliberate look, but it is harder to balance for a relaxed portrait.


    Turn the face toward the light


    Place the subject a few feet from the window, with the window about 30 to 60 degrees to one side of the camera. Ask them to turn their nose slightly toward the brighter side. This creates a small difference between the lit cheek and the shadow cheek, giving the face shape without making one side disappear.


    Take a test frame and inspect the eyes, nose, and cheek. A small highlight in the eye helps the portrait feel engaged. If the shadow side is too dark, turn the subject a little more toward the window or bring a white board, sheet, or pale wall opposite it. If the light looks flat, rotate the face a little away so the shadow becomes more visible.


    Set a comfortable distance and background


    Light becomes softer when it comes from a larger source relative to the subject. Moving close to a broad window often makes it feel larger. The subject can also move closer to the window for more light, but avoid pressing them against the glass; a little room allows natural posture and lets you place the camera.


    Check what sits behind the person. A plain wall, curtain, or tidy corner helps the face stay central. If the background is bright, the camera may darken the face to protect the window. Reframe so the window is outside the image, or tap the face on a phone to set exposure there. On a camera, use exposure compensation if the face is still too dim.


    Focus on the near eye


    For a head-and-shoulders portrait, focus on the eye nearest the camera. Use single-point autofocus or eye detection if it reliably selects the intended eye. With a phone, tap the eye and hold still for a moment after taking the picture. At a wide aperture, the depth of field can be shallow, so a tiny shift in the subject’s head may move the eye out of focus.


    Keep the shutter speed fast enough for small movements. A person breathing or speaking can soften a slow exposure, even if the camera is on a tripod. If the room is dim, raise ISO before accepting a shutter speed that produces motion blur. A little visible grain is often less distracting than an unsharp eye.


    Make the camera exposure look natural


    Use aperture priority if you want to control background blur while the camera chooses shutter speed. A moderate aperture such as f/2.8 to f/4 can soften a background without making focus unforgiving. On a kit zoom, choose the longer end of the lens and step back enough to frame the subject. If your lens does not open that wide, keep some distance between the subject and the background; that separation can make the background less prominent.


    Check the skin, not only the histogram. Bright window areas may clip, but a small area of featureless white outside the frame is not always a problem. The face should retain detail in both highlights and shadows. If the skin looks too bright, reduce exposure slightly. If it looks dull, add a little exposure or bring the face closer to the window.


    Give the subject something to do


    People can look stiff when they are told only to smile. Ask them to look toward the window, then back at you. Let them adjust a sleeve, turn a shoulder, or take a breath between frames. Photograph a short sequence rather than asking for one perfect pose. Watch for relaxed hands and a natural chin position.


    For glasses, turn the face a few degrees or raise the camera slightly to move reflections away from the lenses. Do not tilt the head so far that the pose feels uncomfortable. If the window reflection remains, shift your own position before moving the person; a small camera-side step often solves it.


    A five-frame practice routine


    1. Make one frame with the face toward the window.
    2. Rotate the face slightly away and compare the shadow.
    3. Move the subject farther into the room and note the change in brightness.
    4. Add white fill opposite the window, then remove it again.
    5. Review the near eye, skin highlights, background, and expression at full size.

    Change one thing at a time. If you move the subject, change the exposure, and swap lenses between every frame, it becomes difficult to tell which decision helped. Keep a note of the window direction and camera settings if you want to repeat the result on another day.


    When window light is not working


    A dark room may not offer enough light for a crisp portrait. Open another curtain, move closer to the window, or use a brighter room. A strongly colored wall can bounce tinted light onto the skin; place the subject near a neutral surface or correct the white balance afterward. Mixed light from a window and warm lamp can make one side of the face blue and the other orange. Turning off the lamp often produces a cleaner starting point.


    Window portraits are not supposed to look identical. The same room can feel calm in soft overcast light and dramatic in late-afternoon sun. Pay attention to where the light falls, make a test frame, and adjust the subject before reaching for complicated gear. Those small choices are what make the setup repeatable.


    Practice takeaway: Start with soft side light, focus on the near eye, and change only one part of the setup per test frame. You will learn more from five comparisons than from a long burst of unchanged shots.

  • Why snow looks grey in photos and how to expose it

    Why snow looks grey in photos and how to expose it

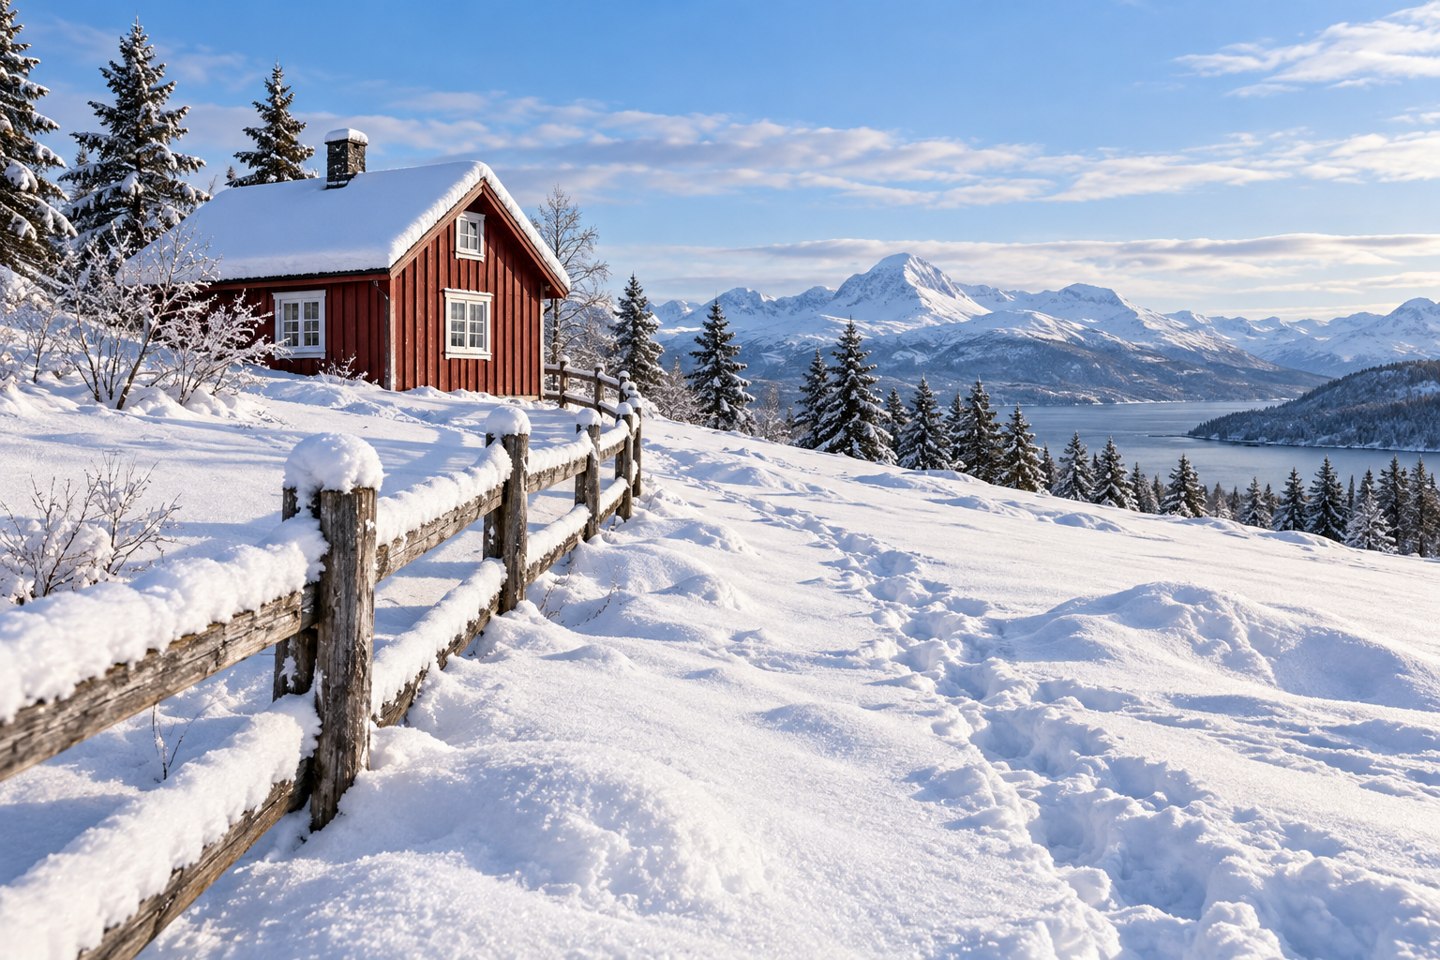
    You photograph a field of white snow and the result looks dull grey. The light has not necessarily changed. The camera may have chosen an exposure that makes a predominantly bright scene darker than you intended.

    Check the photograph first. If the snow looks too dark, try positive exposure compensation and take another frame. Keep an eye on the brightest textured areas as you increase it. Snow can look bright while still showing footprints, ridges, and the shape of the ground.

    Why the meter can darken a snowy scene

    The camera measures reflected light. A frame full of snow sends it a different mix of tones from a frame full of dark trees. Depending on the metering mode and camera, automatic exposure may pull the bright scene toward a middle tone. Canon explains this behaviour in its snow photography guide.

    How much correction you need depends on the composition. A close view of snow and a view containing a dark cabin can produce different meter readings in the same light. Recheck exposure after reframing, especially when you include more sky or a much darker subject.

    Make one small exposure change

    In aperture priority, choose an aperture that suits the scene, then take a reference frame at zero compensation. If the snow is too dark, try +2/3 EV. Compare the new photograph with the first. Increase or reduce the compensation in small steps until the important snow looks bright and retains the detail you want.

    The +2/3 EV setting is a starting experiment, not a fixed snow preset. Some scenes need more correction; others need none. Strong sunlight on a snowbank can leave less room to brighten the image than soft light on an overcast day.

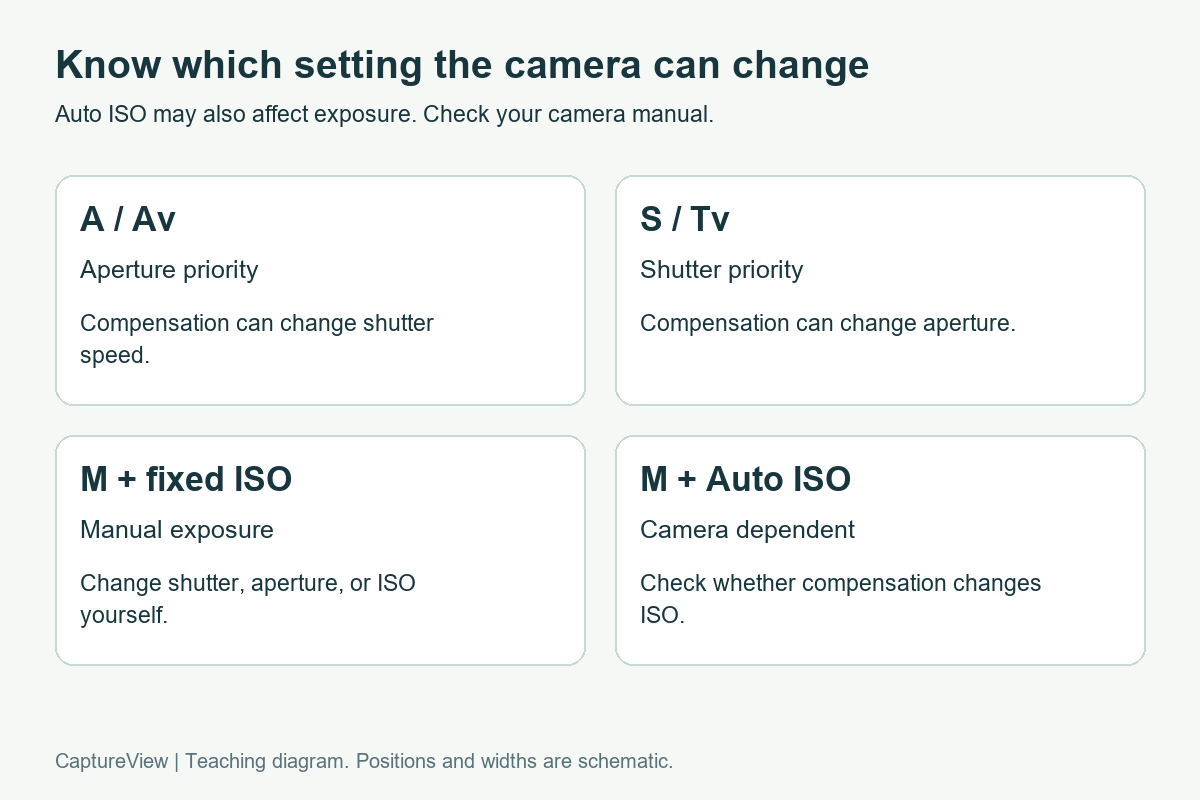
    Four camera exposure modes and the settings exposure compensation can change
    The effect of compensation depends on the mode and Auto ISO behaviour. Check your camera manual.

    Watch the shutter speed while you adjust. In aperture priority with fixed ISO, positive compensation normally lengthens the exposure. If you are handholding or photographing moving people, make sure the resulting shutter speed remains suitable. Auto ISO can alter how the camera reaches the requested brightness.

    Check highlights before adding more

    Magnify a bright patch of snow that matters to the photograph. Can you still see its surface? Enable highlight warnings if your camera offers them. Broad flashing areas across an important snowbank are a reason to check the exposure more carefully and try less compensation.

    A few tiny sparkles can reach pure white without spoiling the photograph. A large featureless patch across the main subject is a different decision. Choose which details you need to preserve instead of treating every bright pixel as an error.

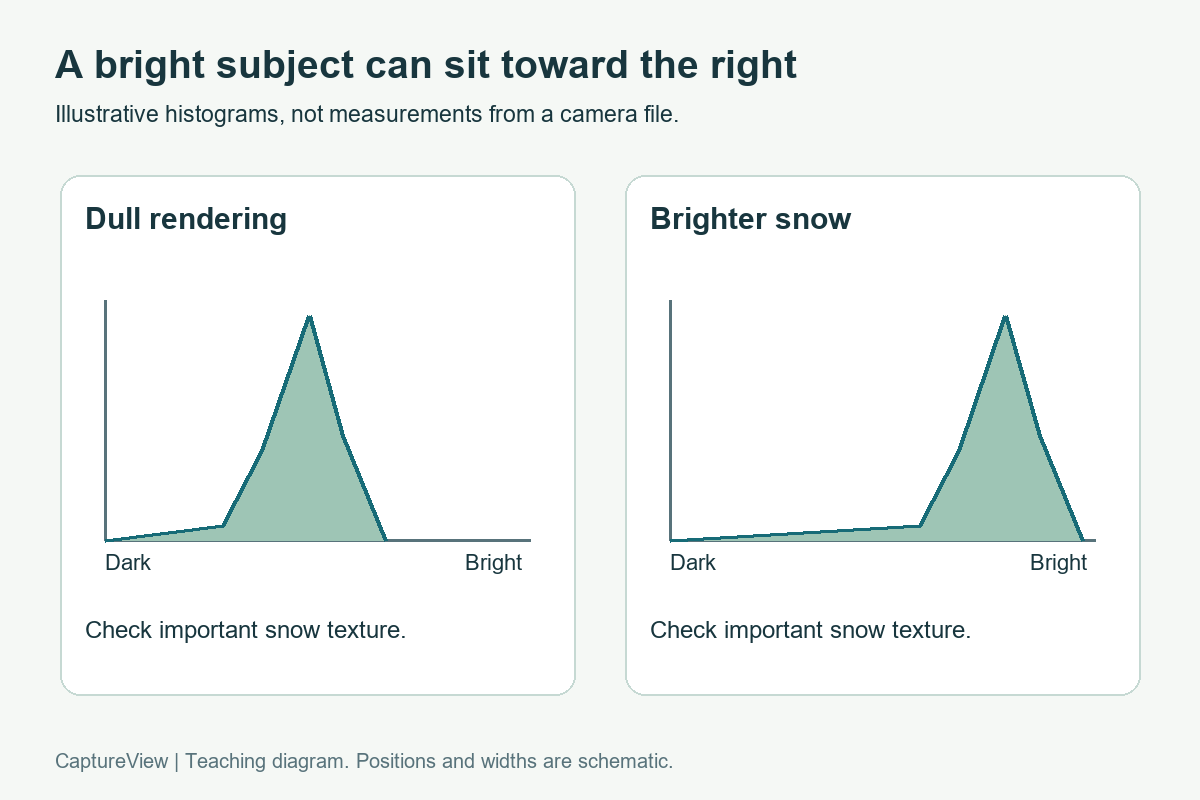
    Schematic histograms comparing dull snow rendering with a brighter result
    A bright subject can put much of the graph toward the right. These shapes illustrate the idea and are not measured camera data.

    A snowy scene can place much of its histogram toward the bright end. The graph does not need to form a hill in the middle. Check whether important bright areas are being cut off at the right edge. If your camera shows separate RGB histograms, inspect those too; a single channel can reach its limit before a combined brightness graph makes the problem obvious.

    Camera histograms and warnings usually describe the processed preview. Picture styles and white balance can affect that preview, so use them as guidance and leave some margin when the detail matters. A raw file offers editing flexibility, but it cannot restore detail that the sensor never recorded.

    When the compensation dial seems to do nothing

    In manual exposure with a fixed ISO, the camera has no exposure setting left to change automatically. Turning compensation may move a meter indication without brightening the recorded image. Change shutter speed, aperture, or ISO yourself, then make another frame.

    Manual mode with Auto ISO behaves differently across cameras. Some models let compensation change ISO; others restrict it. Check the relevant section of your camera manual. If the image is unchanged, confirm which settings actually moved and whether an ISO or aperture limit has been reached. Our camera basics guide is a useful place to review the controls.

    Grey snow and blue snow need different checks

    A photograph can have acceptable brightness and still look too blue. Snow in shade often reflects blue sky. Raising exposure changes brightness; white balance changes colour rendering. Compare the snow in sun with the snow in shade before trying to make every patch neutral.

    For a practice sequence, keep white balance unchanged while testing exposure. Once you have chosen the brightness, compare a different white balance on a copy or in your raw editor. This makes it easier to see which change solved which problem. The editing lesson covers keeping an original and comparing restrained adjustments.

    Try the comparison close to home

    1. Choose a safe, accessible scene with a textured patch of snow and a darker object.
    2. Keep the framing, aperture, and white balance steady. Take a zero-compensation reference.
    3. Try +2/3 EV, then adjust from what you see. Check both snow texture and shutter speed.
    4. Reframe to include more of the dark object. Notice whether the meter changes its recommendation.
    5. Reset compensation to zero when you finish so it does not carry into the next shoot.

    A white towel or folded white fabric in indirect daylight can stand in for snow when you practise metering indoors. Keep folds visible and repeat the same comparison. It will not reproduce outdoor snow lighting, but it gives you a bright subject on which to learn the compensation control.

    Scene photograph: AI-generated teaching illustration. Diagrams are schematic and do not report measured camera results.

  • How to keep both rows sharp in a group photo

    How to keep both rows sharp in a group photo

    The front row looks sharp, but the people behind it look soft. Before changing focus modes, look at how far apart the rows are. A group spread across several distances asks more of your depth of field than a group arranged in a shallow space.

    For a small, fairly still group in daylight, start by bringing the rows closer together. Try f/5.6 or f/8 if your camera allows aperture control, check the shutter speed, and inspect faces in both rows. These are starting points for a test frame. The distance to the group and the depth of the arrangement decide whether they are enough.

    Arrange the faces before choosing a focus point

    Ask the back row to move forward, leaving enough room for everyone to stand comfortably. Place their faces in the gaps between the people in front. A seated front row and a standing back row can make this easier. Watch for someone leaning far forward or standing well behind the others.

    Keep the group roughly parallel to the camera. If the line of faces runs diagonally away from you, one end is farther from the lens. Moving the camera toward the middle of the arrangement can reduce that difference. Leave a little space around the outside people so you can straighten or crop the frame later.

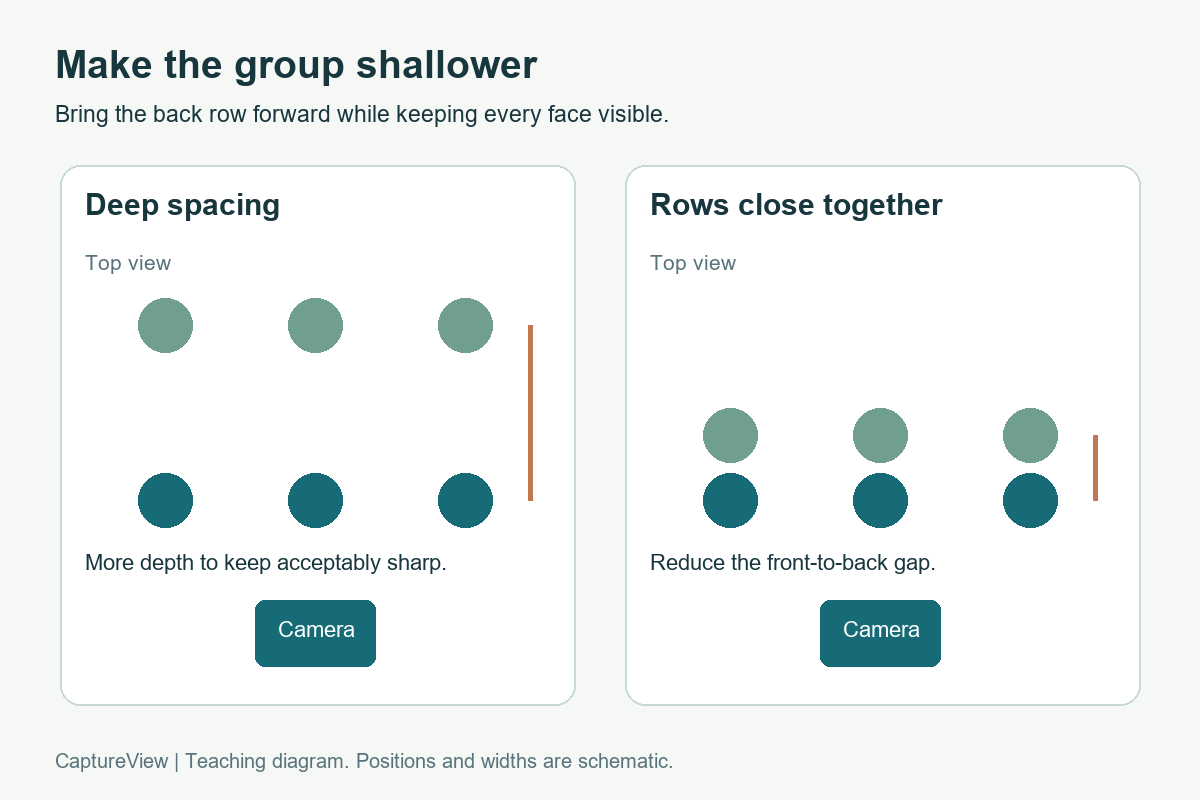
    Top view comparing widely separated rows with two rows placed close together
    A smaller front-to-back gap makes the group easier to cover with depth of field. Positions are schematic.

    Use a position where you can see every face without asking anyone to balance on an unstable step. If a person’s eyes disappear behind someone else’s head, change the arrangement. A smaller aperture cannot reveal a hidden face.

    Choose an aperture that covers the group

    A wide aperture used for a single portrait may leave too little depth for two rows. Nikon’s portrait guidance also cautions that a very wide aperture can make the sharp zone too narrow. Start with a moderate aperture and judge the result at your actual shooting distance.

    If a test at f/5.6 leaves one row soft, try f/8 while keeping the camera position steady. Check the shutter speed again after the change. In aperture priority, the camera may lengthen the exposure to compensate for the smaller opening. Auto ISO may help maintain a usable shutter speed, within the limits you set.

    In a dim room, closing the aperture repeatedly can leave you with a slow shutter or a high ISO. Bring the rows closer, find better light, or reduce the depth of the arrangement before making another adjustment. Our exposure controls lesson explains how these settings affect one another.

    Place focus deliberately and check the result

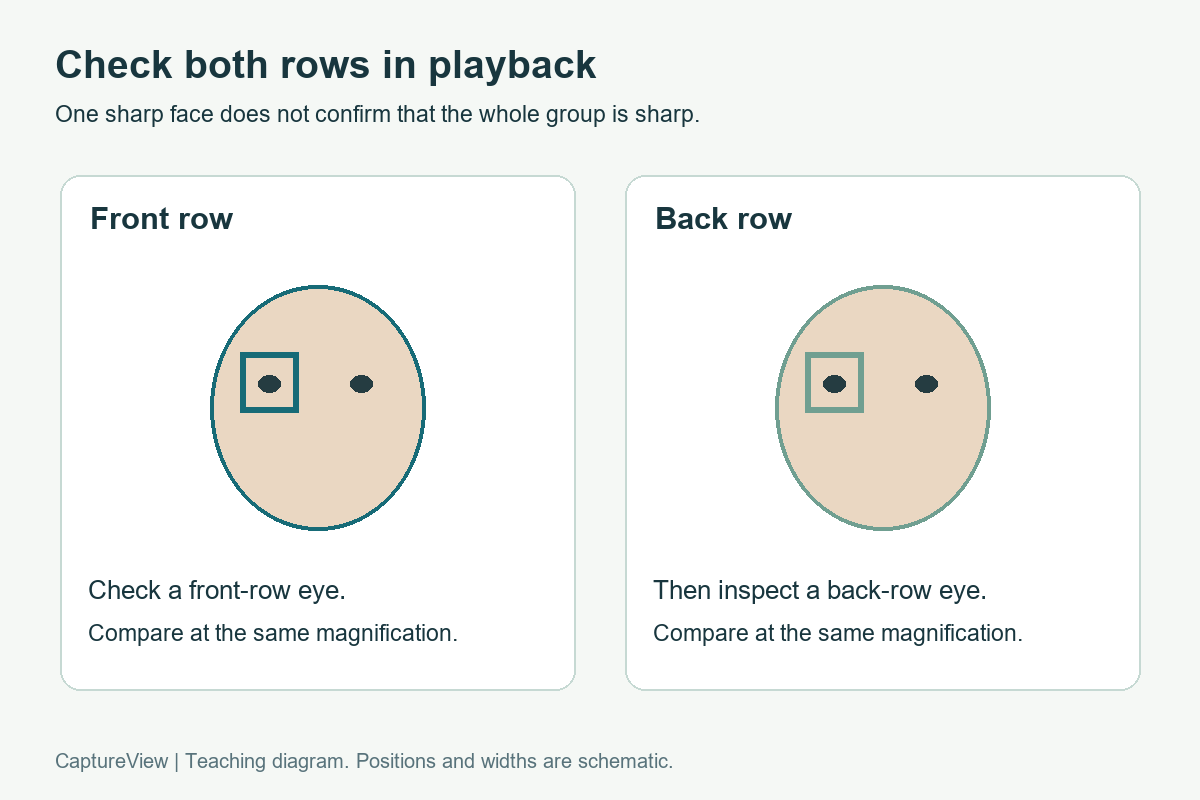
    For a shallow two-row arrangement, begin with a clearly visible eye in the front row near the middle of the group. Take a test frame and compare that eye with a face in the back row. If the rear faces are soft, reduce the gap or use a smaller aperture and test again. A deeper arrangement may require a different focus distance; no single face is the right focus target for every group.

    Eye detection can select one person reliably while the rest of the group falls outside the depth of field. Watch which eye the camera selects. If it keeps jumping to the wrong person, choose a smaller focus area or select the intended subject using the controls your camera provides.

    Two playback inspection panels for checking an eye in each row
    Inspect both rows at the same magnification before accepting the photograph. This is a review diagram, not a sharpness test.

    Avoid focusing on an eye and then making a large change to your camera angle. Put the focus area over the intended eye in the finished composition. If people sway or change position, focus again before the next frame.

    Separate missed focus from movement

    Look at a stationary detail near the faces, such as a collar or the bench. If that detail is sharp but a person’s face is smeared, subject movement may be involved. When every part of the frame has a similar directional smear, investigate camera shake as well as shutter speed. An out-of-focus face usually looks soft without one clear direction of movement.

    For adults trying to hold still, 1/250 second is a reasonable first test in available light. Children, animated gestures, or a longer lens can call for a faster shutter. Raise ISO when necessary to keep the shutter speed you need. Stabilisation can reduce camera shake, but it cannot stop someone turning their head.

    A short practice session with a small group

    1. Arrange two close rows in even light and make sure every face is visible.
    2. Take a test frame at f/5.6 with a shutter speed suitable for the people in front of you.
    3. Keep the framing and focus target steady. Take another at f/8, adjusting ISO if needed to preserve shutter speed.
    4. Inspect a front-row face, a back-row face, and the faces at both edges at the same magnification.
    5. If one row remains soft, bring the rows closer and repeat. Make several final frames to give yourself a choice of expressions.

    Review before the group disperses. Check blinking eyes and hidden faces as well as sharpness. For help choosing the light, read our window-light portrait lesson. If shake is still affecting your photographs, work through the handheld sharpness exercise with a stationary subject first.

    Scene photograph: AI-generated teaching illustration. Diagrams are schematic and do not report measured camera results.

  • Why Do My Sharpened Photos Have White Edges?

    Why Do My Sharpened Photos Have White Edges?

    Published: Updated:

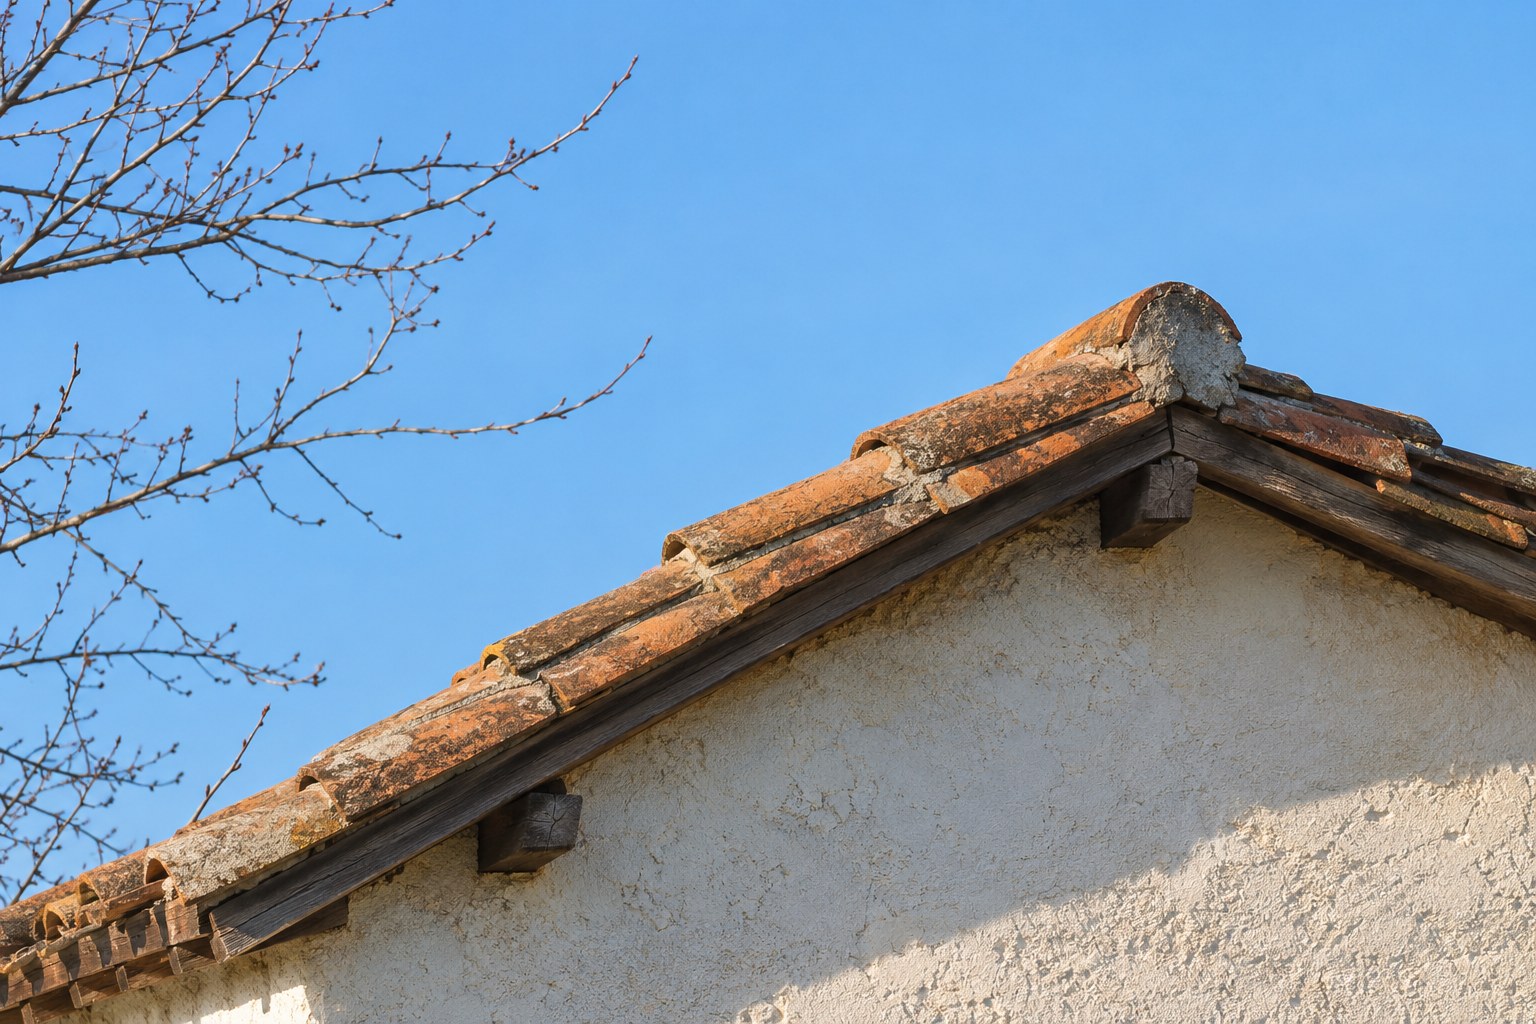
    A roofline looked clean before editing. After sharpening, a pale outline separates it from the sky. The picture seems crisp at first glance, but the edge starts to look cut out. You have probably strengthened an edge more than the image needs.

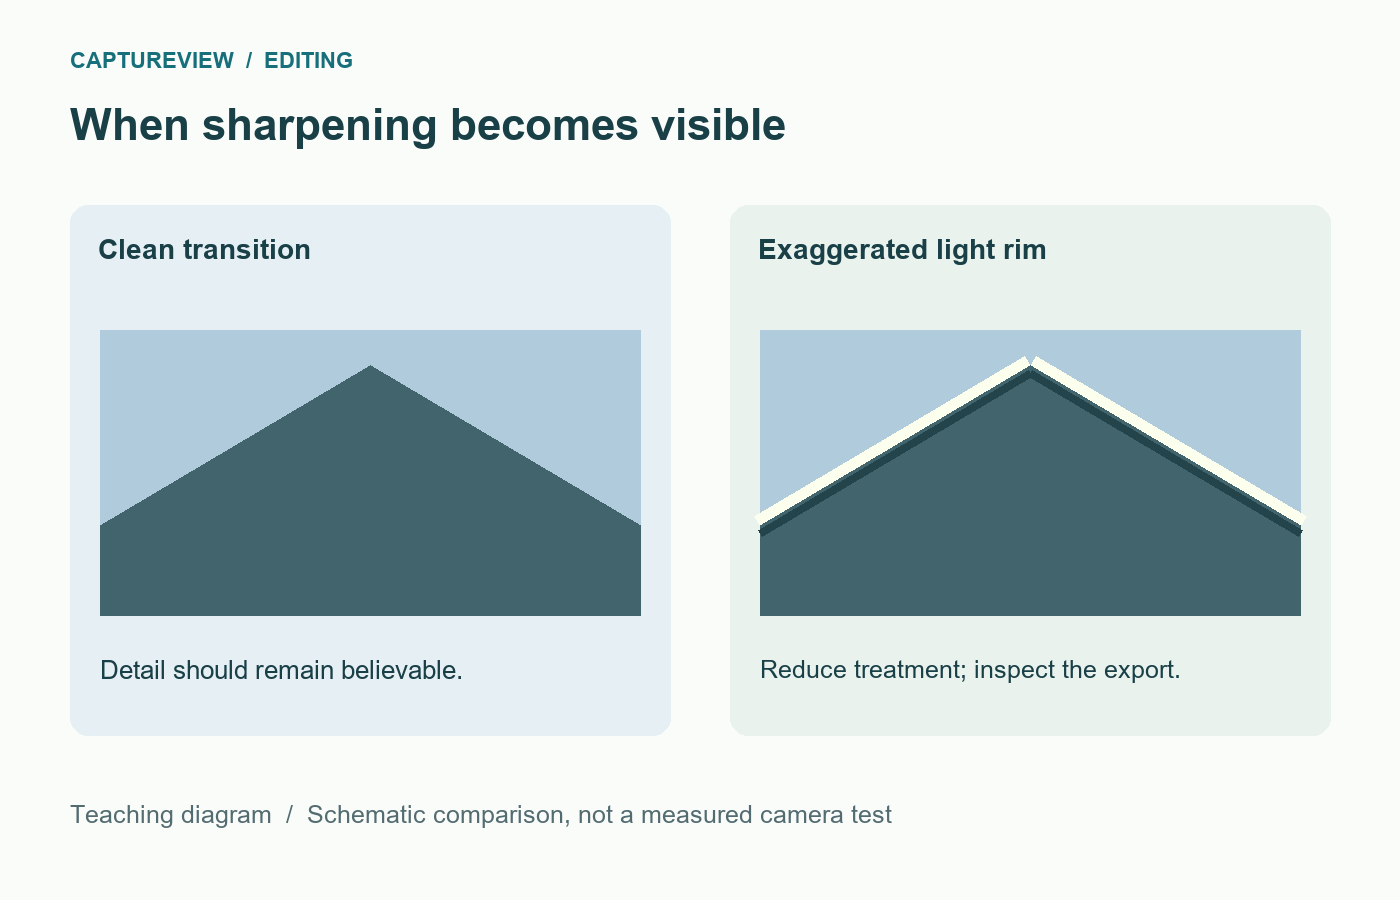
    Sharpening often increases contrast around transitions between light and dark. Pushed too far, that treatment produces a visible bright or dark rim, usually called a halo. It can emphasise existing detail, but it cannot reliably turn a genuinely out-of-focus photograph into a sharply captured one.

    Terracotta roofline and fine bare branches against a blue sky
    Inspect roof edges and fine branches for bright rims after sharpening, then check the exported file. AI-generated teaching illustration; the exaggerated halo comparison is shown separately below.

    Check whether the rim is actually new

    Return to the original or temporarily disable the edit. Compare the same edge at the same magnification. If the pale outline was already there, sharpening may have exaggerated it rather than created it. Bright backlighting, lens effects, colour fringing, compression, and local adjustments can all complicate the diagnosis.

    Look at more than one area. A thin bright edge around every branch suggests a different problem from a broad glow along only the boundary of a sky mask. Avoid treating every light outline with the same slider.

    Roofline comparison with a clean transition and an exaggerated pale sharpening halo
    The light rim is exaggerated to make the artifact visible. Compare your actual image at 100% and at its intended display size.

    Reduce sharpening before adding another correction

    In Lightroom Classic, inspect the image at 100% and work in the Detail panel. Lower Amount to see whether the rim weakens. Then compare Radius. A radius that is too large for fine branches or small facial details can make the treatment look obvious.

    Keep the changes separate. If you lower Amount, Radius, and Detail together, you may improve the picture without learning which control caused the problem. Start with the suspected setting, compare, and then make the next change if needed.

    Adobe describes Radius as the size of detail affected and warns that an excessive radius can look unnatural. Amount controls edge definition, while Detail changes how strongly fine information is emphasised. These names are specific to the application; other editors may organise similar controls differently.

    Do not sharpen the sky just because you sharpen the roof

    A smooth sky or a softly blurred background rarely needs the same treatment as a detailed building. Lightroom Classic’s Masking control can restrict sharpening towards stronger edges. Hold Alt on Windows or Option on macOS while adjusting it to inspect the mask preview: white areas receive the treatment, while black areas are protected.

    Fine green leaf veins and a clean outline against a smooth blue background
    Inspect useful detail in the leaf while protecting the smooth background from unnecessary sharpening. Check the edge for a pale rim. AI-generated teaching illustration.

    This sharpening mask is separate from the local Masking workspace used for subjects, skies, brushes, and gradients. Confusing the two can make tutorials difficult to follow. Start by finding the Sharpening controls inside Detail.

    Masking is not a cure for an oversized halo on the very edge you have selected. If the roofline is white in the sharpening mask, excessive Amount or Radius can still affect it. Reduce the underlying treatment first.

    If sharpening is off and the outline remains

    Temporarily disable local masks one at a time. A strongly darkened sky beside an unchanged tree can expose a broad boundary. Check the mask coverage at branches and soften or refine the transition as your editor allows. Avoid painting a bright outline around the tree to hide a dark one.

    Next compare strong Clarity, Texture, Dehaze, or similar local-contrast adjustments. They work at different scales and do not all behave like sharpening, but an aggressive combination can make edges look harsh. Reset one suspect control, inspect, and restore it if it was not responsible.

    If the outline is distinctly purple or green, inspect the lens-correction tools instead. Colour fringing is not the same as a neutral sharpening halo, and reducing all detail may only soften the photograph without solving the colour.

    Inspect the exported file, too

    Resizing changes the detail available in a picture. Output sharpening then acts on the version you export. A small JPEG may look harsh even when the full-resolution editing preview seems acceptable.

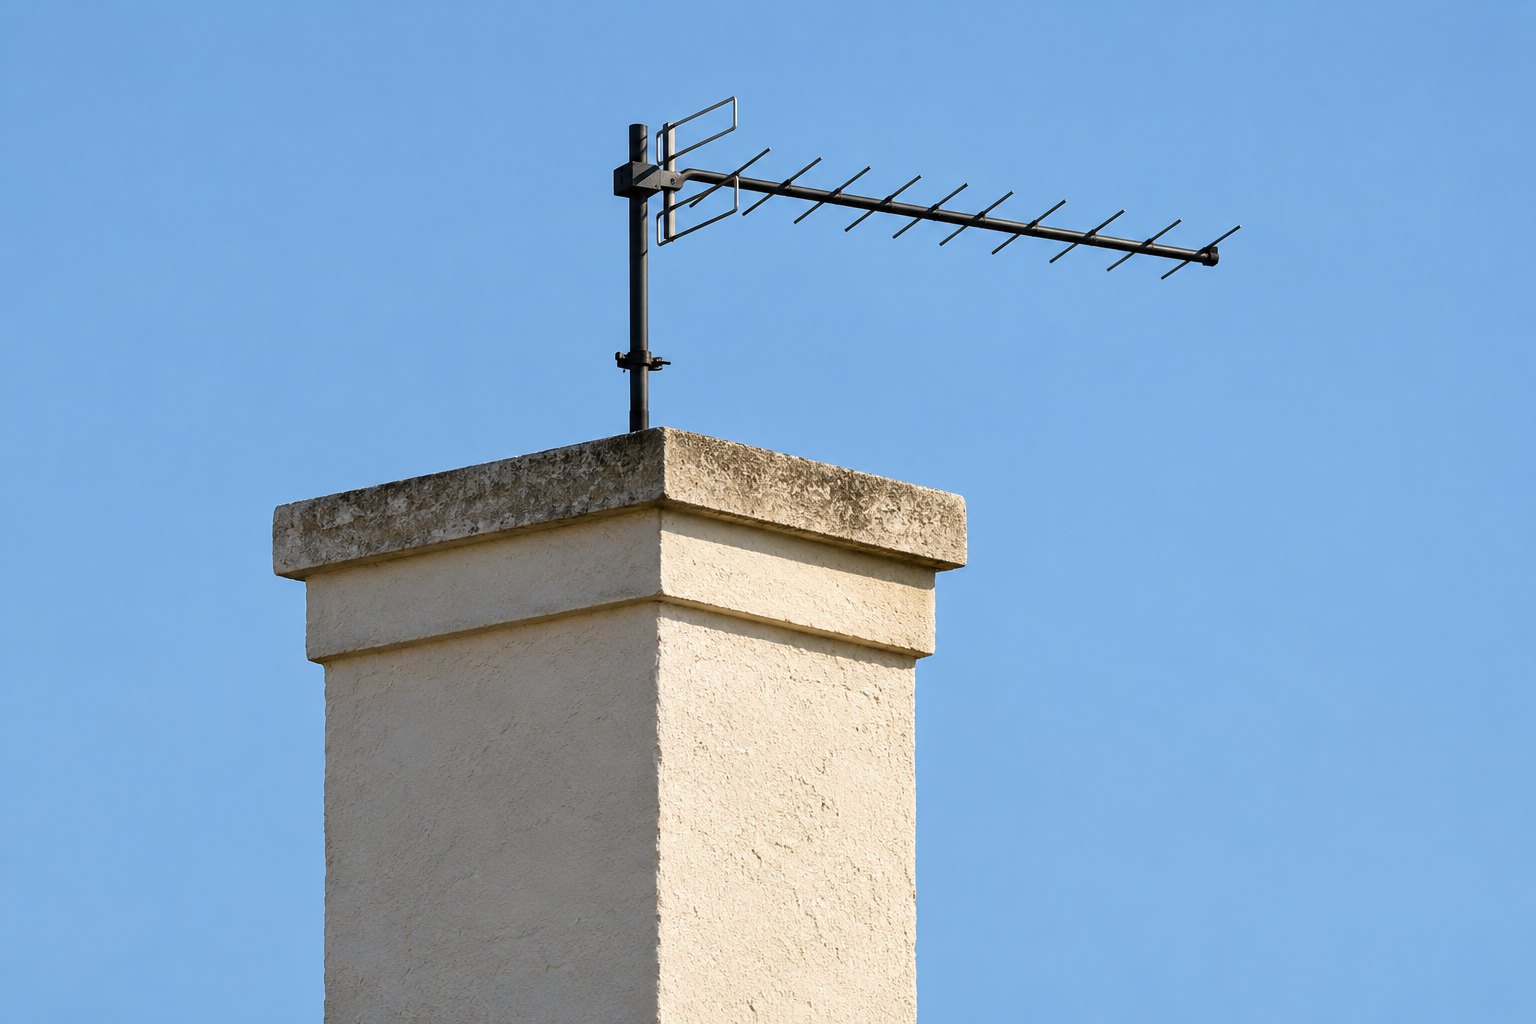
    Cream chimney and thin dark aerial forming clear edges against the sky
    Fine aerial lines and the chimney boundary are useful areas to inspect for halos at 100%, then again after export. AI-generated teaching illustration.

    Export two otherwise identical copies at your intended pixel dimensions: one without output sharpening and one with a modest output setting. Open both at 100% and also at their normal display size. If only the sharpened export has the rim, reduce or disable output sharpening. If both have it, return to the main edit.

    Keep the original file and editable version. Do not repeatedly open, sharpen, and overwrite the only JPEG. Recompression makes later comparisons harder and can introduce artifacts of its own.

    A ten-minute edge test

    1. Choose a photograph with a roof, trunk, or other clear edge against an even background.
    2. Create a virtual copy or duplicate edit so the original remains available.
    3. At 100%, lower sharpening Amount and note whether the light rim changes.
    4. Return to the starting version, reduce Radius, and compare the same edge.
    5. Check a textured area and a smooth area before choosing the gentler version.
    6. Export at the size you actually need and inspect that file rather than judging only the editor preview.

    Keep a short note of the control that changed the rim. There is no useful universal sharpening recipe across every camera, crop, subject, and output size. The point of the test is to recognise when the treatment becomes visible.

    Choose detail over the appearance of crispness

    When skin looks gritty or leaves turn into brittle outlines, back off and compare with the original at a normal viewing size. Compare the edited file with the original at its intended display size before deciding whether the extra crispness improves the detail.

    Use a restrained editing pass to check the rest of the picture. If the original has directional smearing or missed focus, review it with the photo-review routine and change the capture next time. Sharpening should help the detail you recorded remain readable, without drawing attention to the processing.

    Sources and further reading

    Adobe Lightroom Classic: retouch photos, sharpening and noise reduction documents Amount, Radius, Detail, and Masking. Control names and placement may differ in other editors.

  • How to Photograph Landscapes on a Windy Day

    How to Photograph Landscapes on a Windy Day

    Published: Updated:

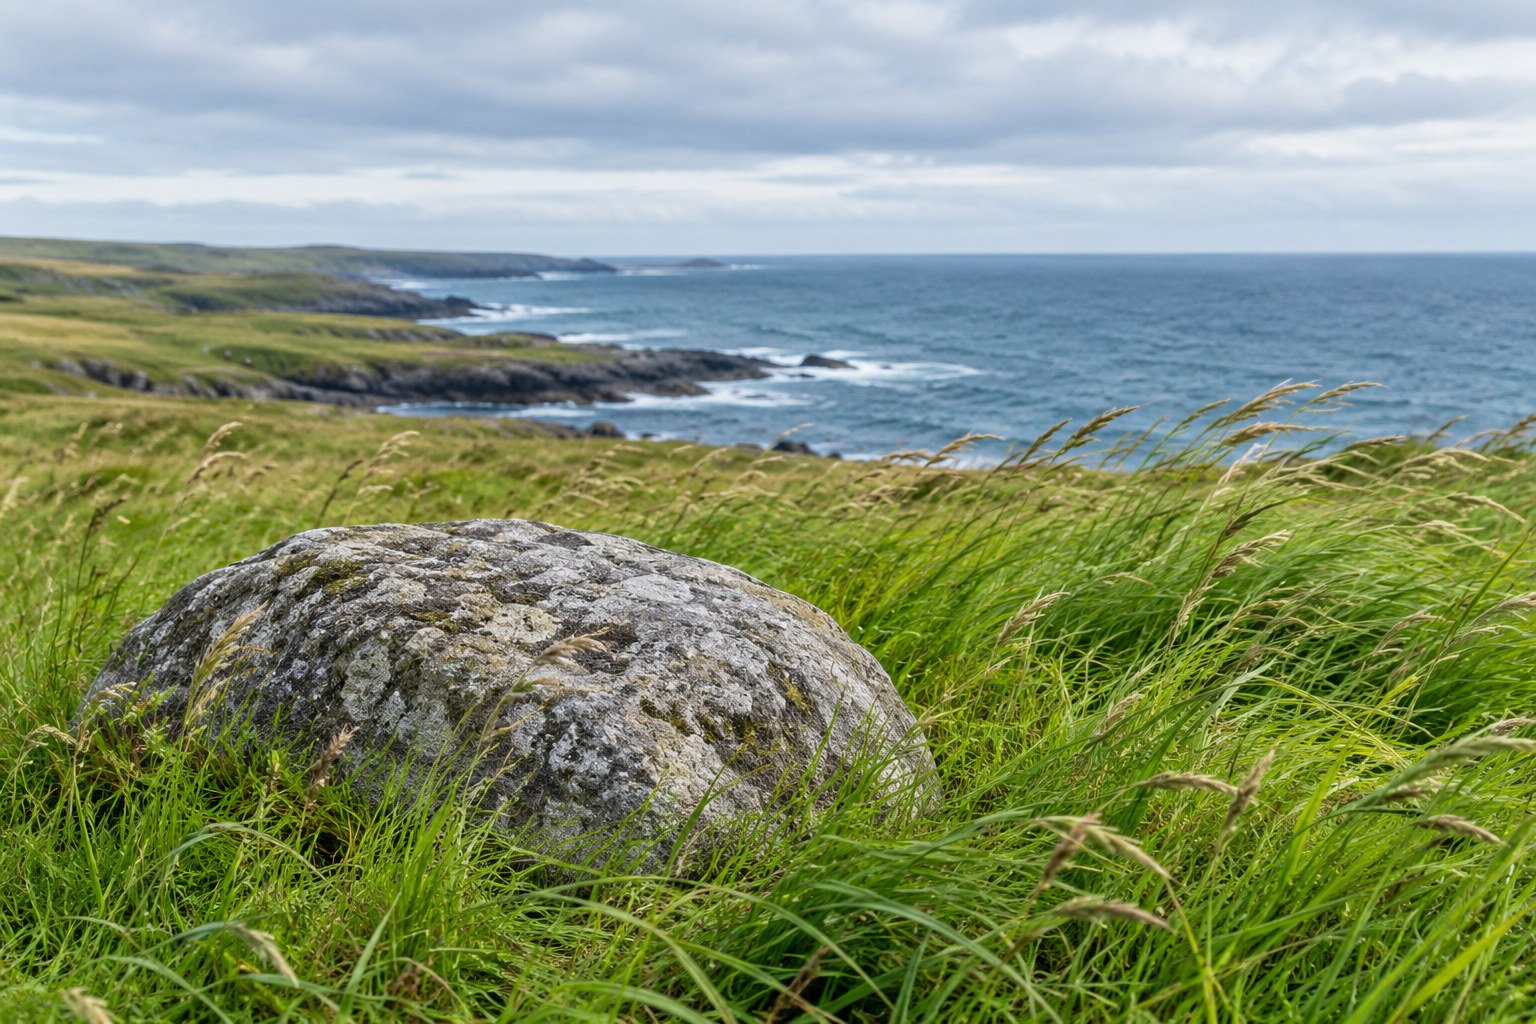
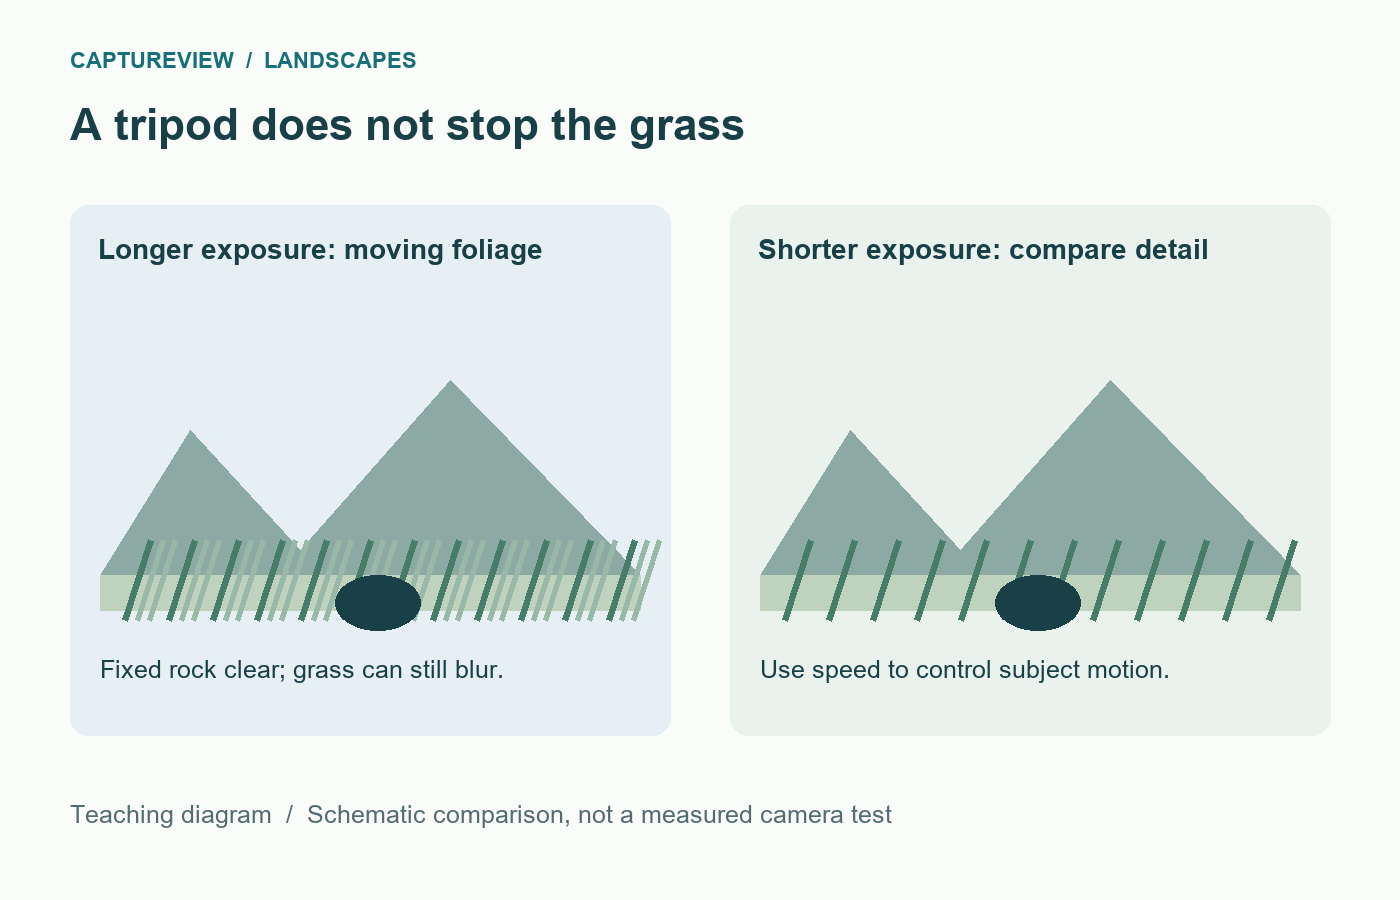
    The rocks look sharp, but the grass in front of them is a soft green smear. The camera was on a tripod, so it is tempting to blame focus. Look at what moved: the tripod held the camera still while the wind moved the grass during the exposure.

    Check whether the camera is moving, then decide whether you want the foliage sharp or blurred. Secure support helps with camera movement; shutter speed controls how much moving foliage blurs. If gusts affect your balance or the support will not stay secure, pack away.

    Solid grey foreground rock surrounded by windblown coastal grass with sea beyond
    Use the rock as a fixed reference when inspecting the moving grass. This illustration shows the scene, not a measured shutter-speed comparison. AI-generated teaching illustration.

    Decide what you want the wind to look like

    For a clear record of leaves, flowers, or foreground grasses, aim for a short enough exposure to limit their movement. If you want the weather to feel present, allow some foliage to blur against a still rock or tree trunk. Neither treatment is automatically better.

    The difficult middle ground is accidental blur: the main subject looks slightly soft without a clear sense of motion. Make a deliberate comparison between a clearly faster frame and a clearly slower one. Small changes may not show you the difference you need.

    Windy landscape diagram comparing blurred grass and clearer grass while a fixed rock remains sharp
    The rock provides a fixed reference. A tripod can steady the camera while grass continues to move during the exposure.

    Inspect something that cannot sway

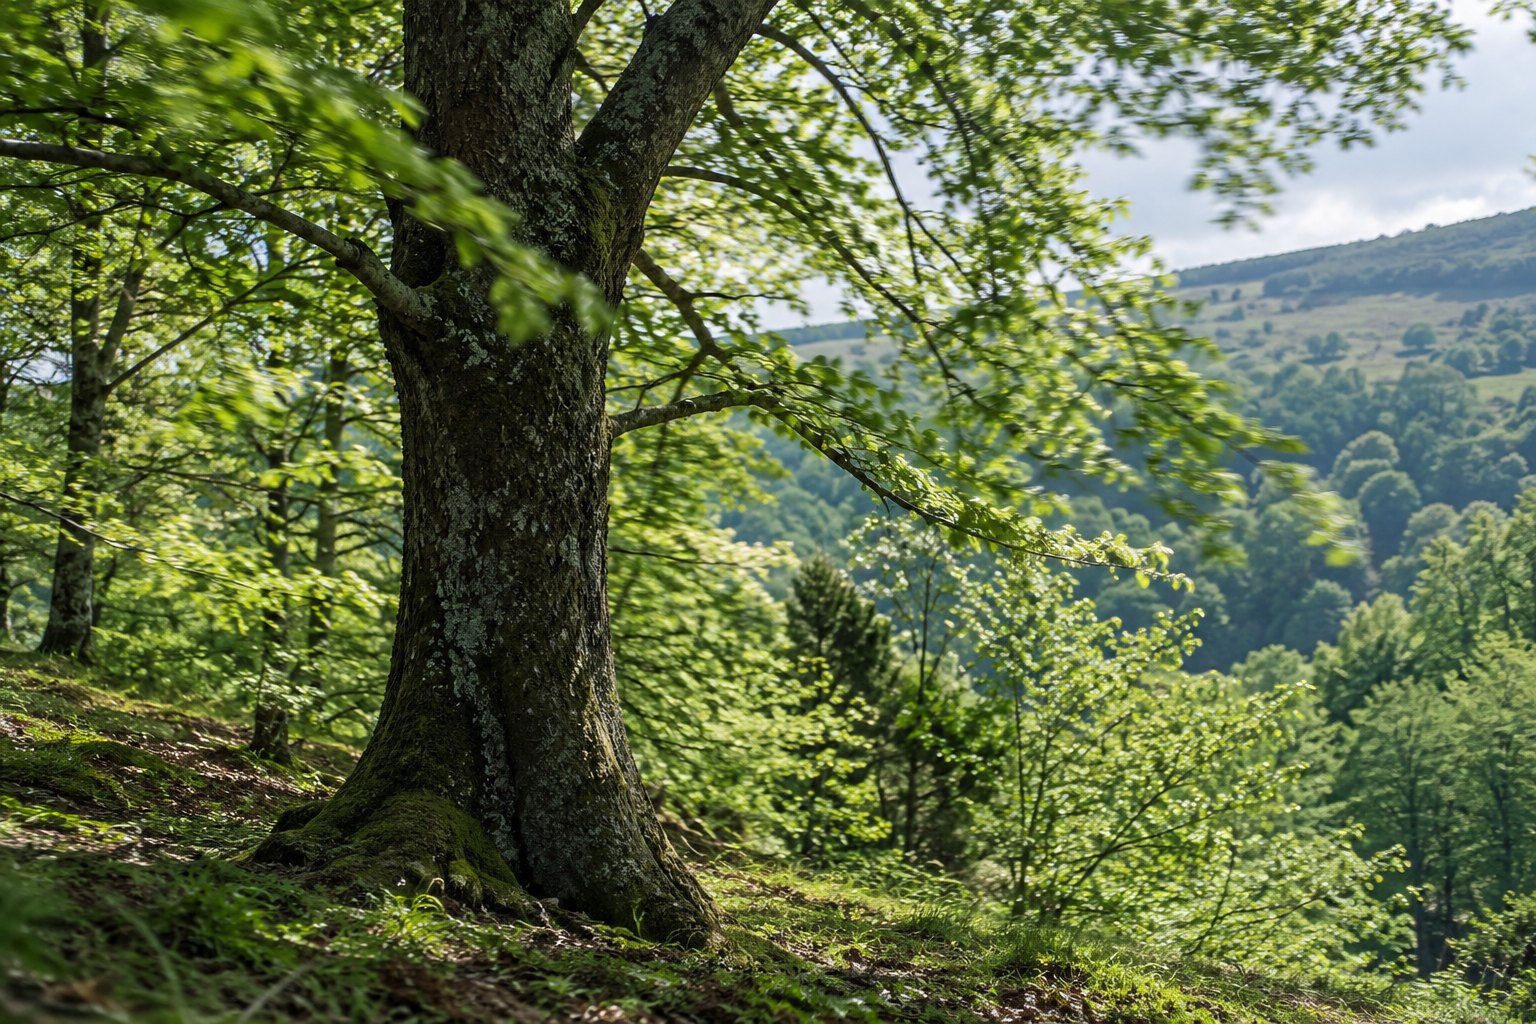
    In playback, magnify a rock, a building edge, or a substantial tree trunk. Then inspect the foliage. If the fixed detail is clear and the leaves trail, subject movement is the main issue. If both smear in a similar direction, check camera movement and support before changing focus.

    Sturdy tree trunk surrounded by thinner leaves and branches in a breeze
    Compare the stable trunk with the finer foliage. Camera support and shutter speed address different sources of movement. AI-generated teaching illustration, not an exposure test.

    If the fixed detail is soft but a different distance is sharp, revisit focus and depth of field. Work through where to focus in a landscape rather than narrowing the aperture automatically. Several problems can occur in one frame, so examine more than one area.

    For crisp foliage, shorten the exposure

    Try 1/500 second as a test when nearby grass is moving noticeably. This is a comparison point, not a universal minimum. Tiny distant leaves, large nearby flowers, focal length, wind speed, and the final display size all change what looks sharp. Take a frame, magnify the important detail, and adjust from there.

    If you were using 1/60 second at f/8, moving to 1/500 second costs roughly three stops of light. Keeping f/8 would require about eight times the ISO for similar brightness, assuming the light stays steady. A frame at ISO 100 would become roughly ISO 800. Those numbers are illustrative; check your actual meter and highlight warnings.

    You can also open the aperture, but only as far as the required depth of field allows. Raising ISO may be a more useful compromise than losing the foreground detail you wanted. Do not insist on the lowest ISO when the subject movement is already ruining the frame.

    Make a tripod less vulnerable to gusts

    Use firm ground, spread the legs securely, and keep the centre column low when possible. Check that the head and leg locks are tight. A tall, lightly extended setup catches more wind than a compact one. Remove a loose strap from the wind when you can do so safely.

    A hanging bag can become a pendulum. If your support is designed for added weight, use the manufacturer’s guidance and avoid leaving a load free to swing. Do not improvise a heavy attachment that might pull the equipment over.

    Use a short self-timer or a release to avoid pressing on the camera during a supported exposure. That removes your touch, not a gust. Follow the camera or lens manual for tripod stabilisation settings; different systems behave differently.

    Wait for a lull, then check the result

    Watch the part of the scene you care about. Grass may pause briefly between gusts even while distant treetops keep moving. Make a short sequence around that lull and choose by detail, rather than holding the shutter continuously and assuming one must be sharp.

    Clouds can change the light at the same time. Recheck exposure when a bright gap opens. A successful earlier setting may now clip the sky or leave the foreground much darker. Avoid changing every setting at once; know whether you are correcting brightness, motion, or depth of field.

    If you choose to show movement

    Keep one reliable visual anchor, such as a rock or a sturdy trunk. With the camera supported, compare exposures such as 1/4 second and one second when light allows. The amount and direction of blur depend on the plants and the gust. A neutral-density filter can permit longer exposures in bright light, but you do not need one just to practise in dimmer conditions.

    Moving foliage makes exposure blending and focus stacking more difficult. Adjacent frames may no longer line up in those areas. For a beginner, a single well-chosen exposure is often a cleaner starting point than a complicated blend with ghosted leaves.

    Change the subject when conditions demand it

    A low viewpoint that includes moving grass may be less useful than a tighter frame of rocks, a sheltered detail, or a distant hillside. Recompose rather than fighting every gust. The horizon-placement lesson can help you remove an unhelpful foreground without making the sky accidental.

    Small ferns beside a mossy stone step in sheltered woodland
    A tighter sheltered detail can be a useful alternative when gusts spoil an exposed view. Keep enough surrounding stone to explain the setting. AI-generated teaching illustration.

    Stay clear of unstable trees, exposed edges, and rough water. If gusts affect your balance or the support will not stay secure, pack away and return in different conditions. Keep a note of the shutter speed that worked and whether the blur came from the camera or the scene. That distinction is useful on the next windy day.

    Sources and further reading

    Nikon: capturing or freezing motion explains shutter-speed choices. The settings in this lesson are test points to adapt to your scene, not measured guarantees.

  • How to Photograph People Wearing Glasses Without Hiding Their Eyes

    How to Photograph People Wearing Glasses Without Hiding Their Eyes

    Published: Updated:

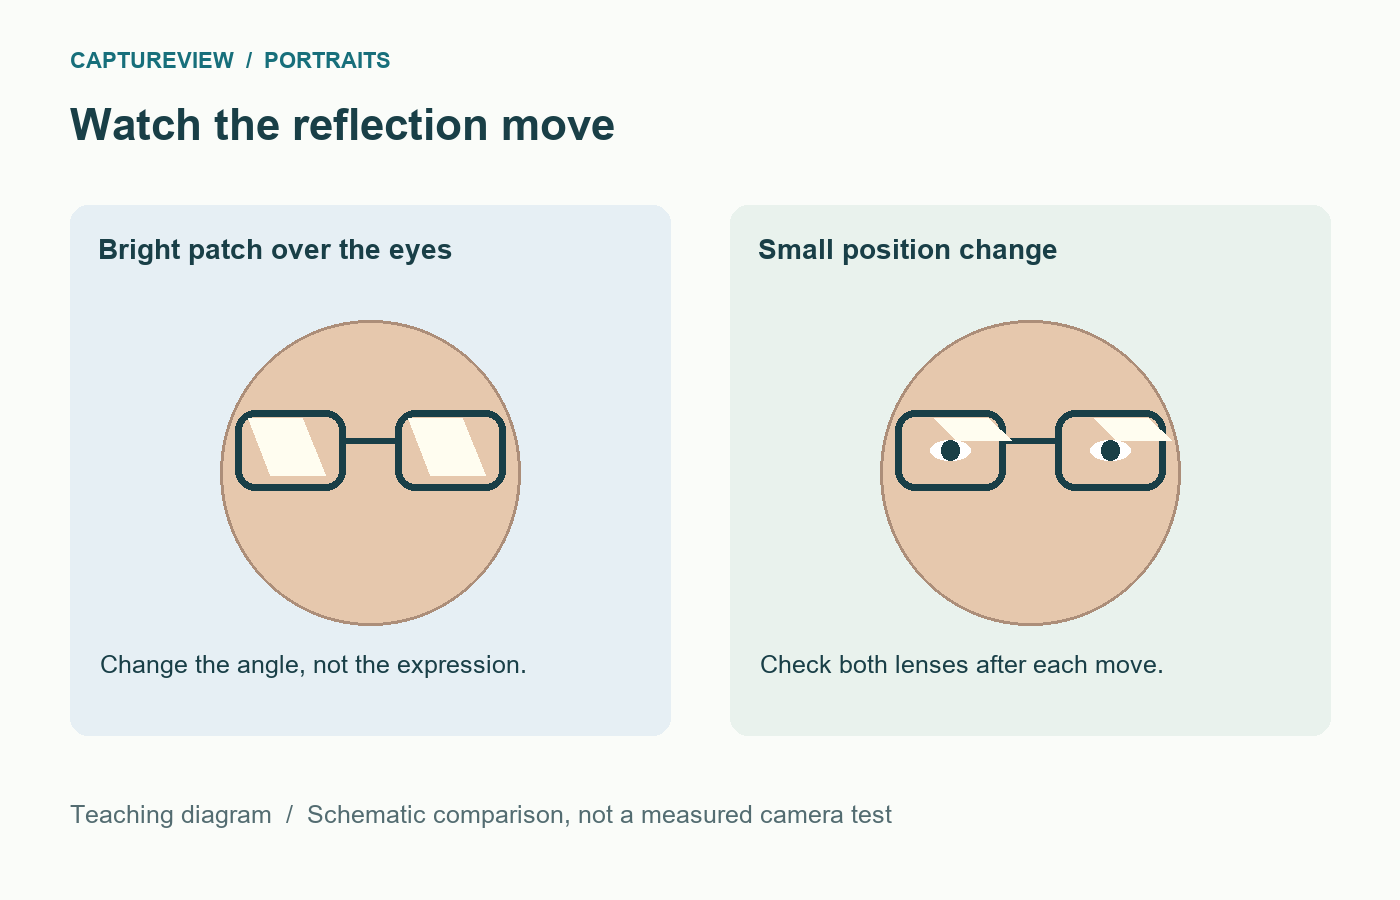
    The portrait looks relaxed, but a bright rectangle covers one eye. You ask for another smile and get exactly the same rectangle. The reflection is showing you where the window is in relation to the glasses and the camera. Repeating the expression will not change that geometry.

    Keep the glasses if the person normally wears them and wants them in the portrait. Start by moving yourself or changing the direction of the light. Aim for visible eyes and a natural expression. A small reflection away from the pupil may be acceptable.

    Find the source of the bright patch

    Before adjusting the pose, look at the reflected shape. A rectangle may be a window, a small hard spot may be a lamp, and several little rectangles may be ceiling lights. Turn off a nearby lamp when it contributes nothing useful. Do not switch off room lighting that somebody needs for safe access.

    Clean the glasses if the wearer wishes to; fingerprints can make a reflection look hazy. Let the wearer handle their own lenses and frames. Coatings, prescriptions, and lens curves vary, so two people standing in the same place may show different reflections.

    Schematic glasses comparison showing a bright reflection over the eyes and a reflection shifted away from the pupils
    A small change in camera, face, or light position can shift a reflection. This schematic does not prescribe a universal lighting angle.

    Move one thing a small amount

    With the subject sitting comfortably, take a reference picture. Then move the camera a little left or right while keeping a similar height and distance. Watch the reflection in live view. If it moves away from the pupil, take another frame and check the expression.

    If moving yourself changes the background too much, ask for a small turn of the face towards or away from the light. Use a direction the person can follow easily: “Turn your nose a little towards the window.” Ask them to keep their gaze comfortable. Avoid twisting the head far away while insisting they stare back into the lens.

    A slight change in chin angle may help, but it can also hide the eyes behind the frame or make the pose uncomfortable. Treat it as a small adjustment, not a compulsory chin-down pose. If the wearer prefers a straight-on portrait, change the lighting position instead.

    Window-lit portrait with dark glasses and both eyes visible through the lenses
    Both eyes remain visible, with small reflections away from the pupils. Adjust the face, camera, or light position in small steps. AI-generated teaching illustration.

    Beside a window

    Start with indirect daylight from one side, rather than placing the window directly behind the photographer. Keep the person a comfortable distance from the window and turn the face gradually. Check both lenses after each useful change: clearing one eye may introduce a reflection in the other.

    Side view of a seated subject beside a window and a photographer in front
    Start with the window beside the subject, then make small camera or face-position changes while watching both lenses. This is a layout example, not a prescribed angle. AI-generated teaching illustration.

    A large window can produce a large reflection even though the face lighting is soft. Moving the person slightly farther into the room or changing your side of the window may move the reflected patch. Judge the resulting cheek shadows as well. Solving the glare while leaving the face too dark is not much progress.

    The setup in window-light portraits is a useful starting point. Adapt it to the glasses rather than copying a particular angle.

    Outdoors or with a movable light

    In open shade, large bright areas of sky can appear in the lenses. Try rotating the person and camera together so the brightest opening is farther to one side. Keep a simple background and watch for coloured reflections from grass or nearby walls. If the light becomes flat, use the approach in portraits in open shade to find more direction.

    Older woman wearing glasses at a shaded doorway with both eyes visible
    A sheltered doorway can provide directional soft light outdoors. Check the eyes and reflections after each change in face direction. AI-generated teaching illustration.

    With a movable lamp or softbox, shift it higher or farther to the side in small steps, using secure support. Inspect the face shadows and both lenses after every change. There is no universal height or angle that clears all prescriptions and poses. A stand outside the frame still needs enough room to be stable.

    Check the eyes, not just the absence of glare

    Magnify a test frame. Are eyelashes or the iris reasonably sharp? Did autofocus choose the glasses frame instead? Eye detection can help, but it is worth checking when lenses distort or obscure the eye. If necessary, use a smaller focus area on a visible eye.

    For a relatively still adult, 1/250 second is a useful initial handheld check in suitable light. Choose a faster speed for movement and an aperture that gives you enough depth of field. A very wide aperture is not automatically flattering if it leaves the important eye soft.

    A faint reflection near the outside of a lens may be harmless. A smaller reflection across the pupil can matter much more. Judge the location and effect rather than counting every highlight.

    A five-minute practice session

    Ask permission and explain that you will make three quick comparisons. Photograph the comfortable starting pose, then move the camera slightly to one side, then try a small face turn with the best camera position. Keep the exposure similar. Show the three frames to the person and ask which expression and lighting they prefer.

    If none works, move to a different window or shaded position. Do not spend the session adjusting the person’s frames or demanding an awkward pose. A changed location can be easier than a complicated fix.

    Do not rely on editing to reveal a hidden eye

    If glare completely replaces the pupil and iris in the file, the original eye detail may not be recoverable. Retouching can become reconstruction. Correct a small distraction cautiously, but prioritise a usable capture when you are still at the location.

    Reflection-removal tools designed for photographs taken through windows are not a guarantee for spectacles. Check the feature’s current documentation and inspect the result closely. The simplest useful edit may be choosing the next frame, where the reflection already misses the eye.

    Sources and further reading

    Adobe: Reflection Removal describes a feature intended for large reflections from shooting through glass. It is not a promise that hidden eye detail can be recovered from eyeglasses.

    u
  • How to Use Negative Space Without Making a Photo Feel Empty

    How to Use Negative Space Without Making a Photo Feel Empty

    Published: Updated:

    A lone tree against a pale sky can feel deliberate. A tiny tree lost in a large, untidy field can feel like you forgot to zoom in. Both photographs have plenty of space. The difference is whether that space helps you notice the tree and understand its surroundings.

    Negative space is the quieter area around your subject. It can be textured water, a shaded wall, mist, or an even patch of foliage. It does not have to be blank, white, or completely out of focus. The useful question is what that area contributes to this particular photograph.

    Small red rowing boat on the right of a calm lake with a large quiet area of water to the left
    The red boat remains easy to identify while the open water provides quiet space and scale. AI-generated teaching illustration.

    Choose a subject you can identify quickly

    Start with one shape: a bench, a flower, a standing person, or a small boat. Before widening the frame, make sure its outline separates from the background. A dark bench against a pale wall is easy to read. The same bench against tangled dark branches may disappear even when you leave room around it.

    For your first attempt, choose a scene with a fairly simple surface behind the subject. You are practising placement, so a quiet wall is a more manageable starting point than a busy market. You can return to complex scenes once you know what you are looking for.

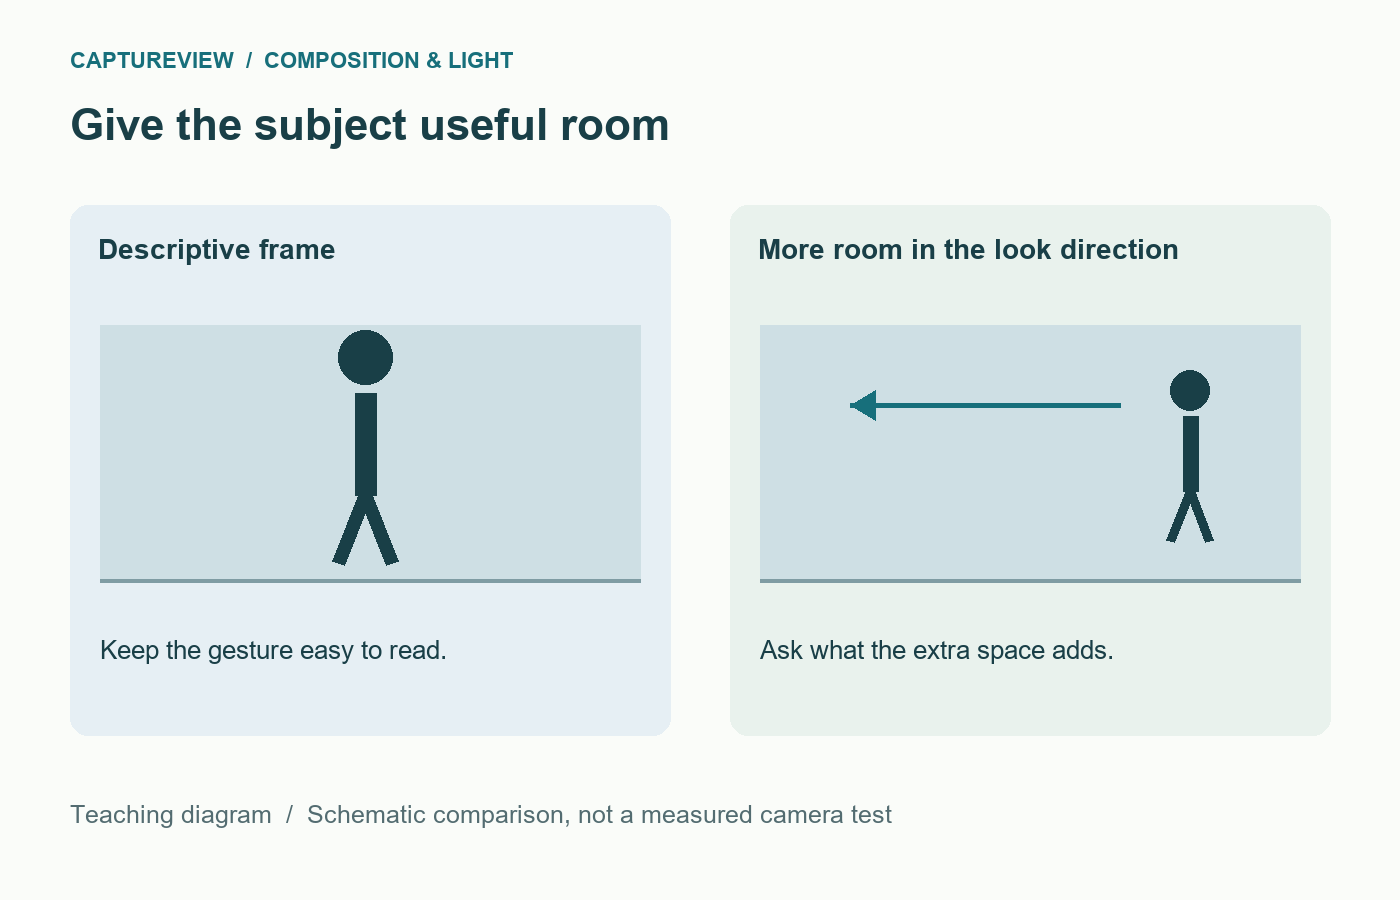
    Comparison of a close subject frame and a smaller figure with quiet space in the look direction
    Compare subject readability and the purpose of the surrounding area. The arrow indicates the intended direction of the space.

    Find the quiet area before deciding on a crop

    Look beyond the subject. Is there one part of the wall with fewer marks? Does a small change in height place the boat against water rather than the far shore? Can you move so a lamp or bright sign leaves the frame?

    Pay special attention to tiny bright objects near the edges. A white scrap in an otherwise dark frame can compete with a much larger subject. Do this check through the camera; a background that feels calm when you look around may contain several distractions inside a rectangle.

    You can use soft focus, but blur is not a substitute for this check. A bright blurred shape still has brightness, colour, and visual weight. Try the changes in simplifying a busy background before opening the aperture further.

    Put the room where it tells the story

    When a person looks to the left, space on the left may make the portrait feel open. Put the person close to the left edge instead and the frame can feel more constrained. Either can work. Make the choice because of the expression or situation, rather than because a grid tells you where a head belongs.

    A yellow chair on the left of a pale blue wall with quiet space to the right
    Here the extra room is on the right. Compare how a tighter crop changes the chair’s size and the sense of the courtyard. AI-generated teaching illustration.

    With a stationary object, there may be no obvious direction. Try space above a small building to emphasise a tall sky, or beside a chair to show the scale of an empty room. A centred object surrounded by equal space can feel quiet and formal. You do not have to place every subject on a third.

    Watch for an accidental half-step: a little unused room on every side, without enough room to establish scale or enough closeness to reveal detail. A noticeably wider or tighter frame often makes the intention clearer.

    Keep enough subject to survive a small screen

    A person who looks clear on a large monitor may become an unrecognisable dot on a phone. Shrink your preview to the likely display size. Can you still tell what matters? If the photograph depends on a facial expression, a very small figure may not carry it.

    That does not mean small subjects are wrong. A tiny walker below a large hillside can explain scale without showing a face. Decide whether you need identity, gesture, or simply a human-sized reference. Then give the figure enough size and contrast for that job.

    Make three frames, not twenty near-identical ones

    1. Make a descriptive frame. Let the subject occupy a comfortable amount of the picture. Keep this as your reference.
    2. Add purposeful room. Widen the view or step back safely, placing most of the extra space on one chosen side.
    3. Push the idea. Make a clearly wider version. Watch what enters the edges and whether the subject remains readable.

    Keep exposure and light similar. Compare all three at the same screen size. Name what the extra area adds: scale, direction, distance, solitude, a setting, or a repeated pattern. If you cannot name anything and the subject is harder to see, try the middle or tighter frame.

    When the empty part keeps attracting attention

    A large pale sky can overpower a small dark subject even when the sky has no detail. Try changing your position, using a quieter background, or reducing the amount of sky. Darkening the whole picture may only make the subject less readable.

    Orange leaf separated from dark pond water with open space to the right
    A readable outline and a quiet background make a small subject easier to recognise. Scan the water and frame edges for competing bright details. AI-generated teaching illustration.

    A tilted horizon is especially obvious when surrounded by quiet space. Straighten it when a level horizon suits the scene, then check the crop again: rotation can cut more from the edges than you expect. For landscape choices, see where to place the horizon.

    Compare the wider and tighter frames at the intended display size. Keep the extra space if it adds scale, direction, or setting while leaving the subject recognisable. There is no required percentage of negative space.

    Sources and further reading

    Adobe: negative space photography provides further examples of subject and surrounding space. The three-frame comparison here is a practical exercise, not a fixed composition rule.

© 2026 CaptureView. All rights reserved.