Photography lessons
Learn photography.
One lesson at a time.
Understand the light, choose your settings, and make a stronger frame. Start with a short exercise you can try today.
Start with the basics Browse the topics ↓New to photography?
A simple place to start.
Follow this learning path with the camera you already have. Change one thing at a time and keep a frame to compare.
Understand exposure
See how aperture, shutter speed, and ISO affect the image.
Control focus and light
Choose the subject, find the light, and check what looks sharp.
Build a clear frame
Watch the background and remove distractions at the edges.
Review and edit
Compare your frames, then make a few careful adjustments.
Explore by topic
Read a lesson, try the steps, and compare your photographs.
Lesson 01 · Start with observation
Getting Started: make one deliberate photograph
A useful photograph begins with a choice: what do you want the viewer to notice? Name the subject before changing settings. Then look at the light, background, and edges. You can practise these choices with a phone, a compact camera, or an interchangeable-lens camera.
A simple shooting routine
- Choose one subject. A cup, a person, a tree, or a detail in a room is enough.
- Find the light. Notice its direction and whether shadows have hard or soft edges.
- Choose your position. Move to separate the subject from a distracting background.
- Focus on the important detail. On a phone, tap the subject. On a camera, choose a suitable focus area.
- Review and change one thing. Check sharpness, brightness, and the frame edges.
Check three things in playback
Sharpness: magnify the subject. A small screen can hide missed focus and movement blur.
Brightness: check important highlights, such as a face or a white object. A histogram and highlight warnings can help if your camera offers them.
Framing: look at corners and behind the subject. Signs, bright patches, and objects touching the subject’s outline can draw attention away.
Need help with the controls? Read Camera & Lens Basics for aperture, shutter speed, ISO, and focus.
Take a photograph from your first position. Make a second from a lower or higher viewpoint. Make a third after simplifying the background. Keep your subject the same and compare where your eye goes first. Write one sentence about what improved.
A useful starting setting
Auto is fine while learning to observe. If you want to control depth of field, try aperture priority with Auto ISO. Check the shutter speed before shooting: automatic exposure does not guarantee that a moving subject will be sharp. On a phone, avoid unnecessary digital zoom and move when safe.
Lesson 02 · Organise the frame
Composition & Light: help the viewer see your subject

Start with the background, not a grid
Composition is how you arrange the elements inside the frame. A clear subject can be lost against a busy background. Move a little left, right, up, or down to remove overlaps and distracting bright areas. This often makes a bigger difference than placing the subject on a particular line.
Use placement with a purpose
The rule of thirds divides the frame into three rows and three columns. Placing a subject near a dividing line can leave useful space around it. Centred framing can work well for symmetry or a direct portrait. Neither is a requirement.
Leave space in the direction a person is looking or moving when that helps explain the scene. Check whether empty space supports the subject or simply feels accidental.
Look for lines and layers
A path, railing, shadow, or shoreline can lead attention through a scene. Check where the line ends: it should help the photograph rather than pull the eye out of the frame.
A foreground object can give a landscape depth, but it should add something. If it hides the subject or feels unrelated, try a cleaner frame.
Read the direction and softness of light
Front light can show detail clearly and produce fewer visible face shadows. Side light reveals shape and texture. Backlight can outline a subject, but it may leave the front dark or create flare. Change your position before deciding that the light is unusable.
A large light source relative to the subject tends to create softer shadow transitions. Indirect window light or open shade is often a manageable place to start. Direct sun often creates harder shadows. Overcast conditions can simplify contrast, though the direction of the light still matters.
- Choose an object near a window or outside in shade.
- Photograph it with the light behind you, then from the side.
- Move to clean up one distracting edge or background overlap.
- Compare shape, shadows, and the first thing you notice in each frame.
Common mistake: following a composition rule while ignoring a distracting background. Check the whole frame before taking the next photograph.
Lesson 03 · People and natural light
Portraits: start with one window

A portrait depends on the person’s comfort as well as the light and settings. Ask permission, explain what you are trying, and give simple directions. A comfortable expression is usually more useful than an elaborate pose.
Set up the light and background
- Choose a window with indirect daylight. If sun falls directly on the face, try moving or wait for softer light.
- Turn off nearby lamps when their colour conflicts with the daylight.
- Place the person beside the window and ask them to turn slightly towards it.
- Choose a simple background and leave some space between the person and it.
- Watch both sides of the face. A white wall or reflector can soften the darker side if needed.
Choose focus and shutter speed
Focus on the nearer eye, or use eye detection if it works reliably on your camera. A wide aperture can soften the background, but very shallow depth of field makes accurate focus more demanding. Start with an aperture that keeps the details you care about sharp.
For a fairly still adult, around 1/250 second can be a useful handheld starting point. A child or an animated person may need a faster shutter. Review at high magnification, then adjust for the movement, focal length, and camera support.
Give small directions
Ask for one change at a time: “Turn a little towards the window,” “Relax your shoulders,” or “Look just beside the camera.” Keep the camera near a height that suits the portrait. Avoid getting extremely close with a wide lens if the facial perspective feels exaggerated; step back and reframe.
Keep your camera position and background steady. Photograph the person facing more towards the window, then slightly away. Compare the shadow on the cheek and the light in the eyes. Ask which version they prefer.
If the face is too dark: turn towards the window, move closer to the light, or adjust exposure. If the eye is soft: reselect focus, check movement, and consider a narrower aperture. If the background distracts: change your position before editing it later.
Lesson 04 · Outdoors and changing light
Landscapes: build a frame with depth

A landscape needs a reason for the frame. Choose a subject or relationship: a tree against a hill, a path through the scene, or water moving around rocks. Including everything can make the main idea harder to see.
Frame the foreground and horizon
Try a foreground detail that belongs to the scene. Move the camera so it does not block the main subject. Check the horizon and vertical lines; a slight tilt can look accidental.
Give more space to the sky when it carries the photograph, and more to the land when the foreground matters. A horizon in the middle can still work, especially with symmetry.
Choose focus and depth of field
For a broad scene, f/8 can be a useful starting point on many cameras. Check both near and far details rather than assuming a narrow aperture guarantees sharpness. Very close foregrounds may need a different focus choice, a smaller aperture, or a different composition.
Use low ISO when the available light and shutter speed allow it. Support the camera when the exposure is too long to handhold steadily.
Use shutter speed to describe water
A fast shutter can retain splash detail. A longer recording time can make water look smoother. Try around 1/4 second as a starting point for blur with the camera supported, then change it for the flow and the appearance you want. Bright light may require a neutral-density filter to reach a long exposure.
A timer or remote release can reduce shake during supported shots. Follow the camera or lens manual for stabilisation on a tripod. Wind can move foliage even when the camera is perfectly steady.
- Choose a safe position with a clear main subject.
- Make a wide frame, then a tighter frame that removes one distraction.
- Change your height to adjust the foreground relationship.
- Compare near detail, horizon placement, and what draws the eye first.
Stay away from slippery water edges and unstable ground. Check local access and weather conditions. Better framing does not justify an unsafe position.
Lesson 05 · A careful finishing pass
Editing: improve the photograph you actually made
Start by identifying a problem: the subject is too dark, the colour looks wrong, or an edge distracts. An editing slider should solve a problem or support an intention. Moving every slider rarely makes the photograph clearer.
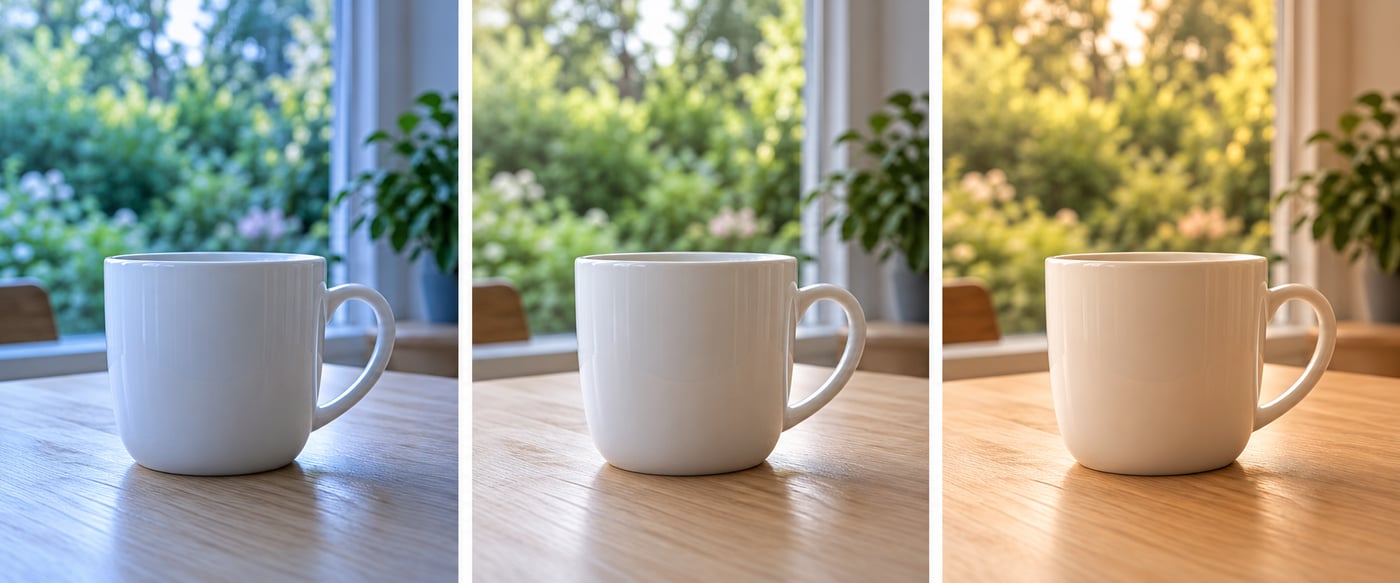
A simple order for your first edit
- Keep the original. Work on a copy or use software that preserves it.
- Check the crop and horizon. Remove distracting edges without cutting useful context.
- Adjust brightness. Watch important highlights and avoid flattening every shadow.
- Set white balance. Look at neutral areas and skin, while allowing the scene’s light to have its own character.
- Use contrast and colour gently. Compare with the original and reduce changes that make skin or foliage look unnatural.
- Export for the destination. Keep the editing original and save a separate sharing copy.
What editing cannot repair reliably
Editing cannot turn severely missed focus into genuine detail or recover every blown highlight. Excessive sharpening can create halos. Noise reduction can smooth fine texture. Check the image at both normal viewing size and high magnification before deciding an adjustment helped.
For an ordinary web or email sharing copy, JPEG in sRGB is a practical starting point. Choose pixel dimensions that suit the destination and inspect the exported result. Avoid repeatedly overwriting and recompressing the only copy.
Choose one photograph and write down two things you want to improve. Adjust only those areas first. Compare the original and edit at the same size, take a short break, then look again. Keep the version that communicates your idea more clearly.
Put it together
Your first week of photography practice
| Session | Task | What to compare |
|---|---|---|
| 1 · Observation | One subject, three viewpoints | Background and edges |
| 2 · Light | Front light and side light | Shape and shadow |
| 3 · Portrait | Two face directions by a window | Eyes and cheek shadows |
| 4 · Landscape | Wide, tighter, and lower frames | Foreground and main subject |
| 5 · Review | Select three frames and edit one | What changed and why |
Keep a short note with each selected photograph. Your next task should come from what you noticed, rather than a new list of settings.
Content by CaptureView Editorial · Editorial Policy
These lessons are starting points. Adapt them to your camera and shooting conditions. Photographs shown on this page are AI-generated illustrations.
Tutorial library
Long-form lessons from the Photography Tips categories.
-
How to Photograph Moving Water With Long Exposures
Published: November 13, 2026 · Updated: November 13, 2026 · By Clara Whitmore, CaptureView contributor Long exposures turn moving water into a soft veil while rocks, shorelines, and…
-

How to keep both rows sharp in a group photo
Arrange a small group with less depth, choose a workable aperture, and check faces in both rows before everyone leaves.
-

Why Do My Sharpened Photos Have White Edges?
Track down sharpening halos around trees, roofs, and faces. Compare Amount, Radius, local contrast, and output sharpening without destroying the original.
-
How to Photograph Landscapes on a Windy Day
Separate camera shake from moving foliage, choose between crisp leaves and deliberate motion, and keep a practical landscape setup when the wind picks up.
-

How to Photograph People Wearing Glasses Without Hiding Their Eyes
Reduce distracting reflections in glasses by changing the relationship between the face, light, and camera. Keep the person comfortable and check both eyes.
-

How to Use Negative Space Without Making a Photo Feel Empty
Use quiet areas of sky, wall, or water to give a subject room. Compare three crops and check subject size, contrast, and the direction of the space.
-
Why Are My Handheld Photos Blurry Even When Nothing Is Moving?
Find out whether camera shake, missed focus, or shallow depth of field is making a still subject look soft. Test shutter speed with a simple handheld exercise.
-
Why Your Photos Look Orange Indoors and What to Change
Fix orange indoor photographs by checking lighting and white balance. Recognise mixed light and preserve warmth when it suits the scene.
-
A Simple Photo Review Routine That Helps You Improve
Review a small set of photographs for subject, light, sharpness, and timing. Write one useful observation and choose your next practice task.